¶ What is Qasida CRM?
Qasida CRM (Customer Relationship Management) is a strategy, system and processes that help an organization manage and develop relationships with its customers. The goal of Qasida CRM is to improve interaction with clients, increase their satisfaction and loyalty, thereby increasing revenues and reducing costs. Qasida CRM is often implemented using software solutions that enable the collection, analysis and management of customer information.
It is a system that serves to manage relations with clients. It provides more information about the client, enables better planning and management of business activities and enables better management of communication with clients.
Qasida CRM can be used for multiple purposes, such as increasing sales, increasing marketing effectiveness, improving customer service, and increasing customer loyalty.
A Qasida CRM also helps you centralize information about your contacts, sales and marketing activities in one place, making it easier to access important data and enabling you to make better decisions. It can also automate routine tasks like sending emails and messages, saving time and improving the efficiency of your teams.
Application Qasida CRM will fit your need:
- for the registration of potential clients - Leads
- for client records, divided into records of companies and natural persons - Contacts - Companies and Individuals
- for recording and monitoring the status of business cases - Business cases
- to generate orders and invoices from the business case - Orders
- for planning meetings, phone calls, emails and tasks for business cases or clients/leads - Schedule
- for creating, planning and tracking the status of tasks for business cases, leads or internal tasks - Tasks
- for event planning - Events and resources - Events
- for the registration of resources - rooms, technical equipment, persons (users) for the purposes of booking Events and resources - Code lists - Resources
- for creating and recording questionnaires for business cases - Questionnaires
¶ FIRST LOGIN TO THE APPLICATION
- To enter the application, you must first log in.
- Enter your login information (name and password) and click the "Login" button.
- If you have entered the correct login information, you should be redirected to the home screen of the application.
.png)
¶ BASIC APPLICATION CONTROL
The chapter describes the basic method of controlling the application and the properties of the components used.
The basic controls are shown in the following images:
- left menu – individual records/modules made available based on authorization
.png)
- New record button – always located in the upper right
.png)
- a basic tabular view of the displayed data, including a "quick" filter - other possibilities for working with the table are described below
.png)
- the detail of the record of any record/module is displayed by double-clicking in the displayed row of the table
.png)
- editing of the record as well as other important actions resulting from work with the record are located in the upper part of the record detail
.png)
.png)
- breadcrumbs allows the user to return to the previous view, or to the initial view of the records
.png)
- funkcionalita workflow (pracovný postup) umožňuje individualizovať Vaše procesy a zároveň umožňuje prechodom do ďalšieho stavu spustiť na pozadí ďalšiu akciu ako napr. vytvoriť úlohu, poslať email a podobne, bližšie možnosti nastavenia a používania sú popísané v kapitole Workflow
.png)
¶ Global filter
- The global filter enables filtering of the required information across all records in selected columns in full text
- By clicking on the record, the user gets to the Details of the record of the record
- The possibility of editing the selected record will depend on the permission setting
- Clicking again on the "Cleaned" filter will show the results from the last search
¶ Custom filter
The custom filter is located in the top left above the table and can be:
- Create and save with a single condition or with a group of conditions
- Edit
- Duplicate
- Delete
The data that can be filtered are defined by the table - columns or data that are necessary for the complete and correct filling out of the record in the given register/module.
¶ Table (Grid)
Almost all records/modules are displayed in the tabular view. It has the following properties:
- Allows the user to turn off/on the display of columns, the number of records per page
- Contains filters above the columns (quick filter) and their mass cancellation option
- Above the table to the right is a control bar with possible functions:
- Exporting records
- Grouping of data in the table according to the column selected by the user, as long as the grouped data can be counted or otherwise expressed mathematically, the value of the grouping will also be displayed
- When registering, it will be possible to use the bar for the total sums of selected values, while it is primarily the sum of the filtered data.
¶ Dashboard
Dashboard – allows you to create a clear arrangement of records in a view with the option of filtering, which the user can arrange from the records and reports that he uses on a daily basis.
Within the dashboard, it is possible to define the display of the following records:
- Companies
- Leads
- Tasks
- Business cases
- Favorite reports
in these views:
- Table
- Chart
- KPIs
Jednotlivé panely slúžia na vytvorenie združeného pohľadu na všetky „moje“ používané moduly, a preto je možné aktívnu prácu s aplikáciou vykonávať len v tejto položke menu a nie je potrebné sa prepínať medzi ďalšími evidenciami.
Po vybratí tabuľky je možné definovať:
- Basic settings
• Title
• Subtitle
• Refreshing
• Refresh interval - Advanced settings
• Enable filtering
•Enable sorting
•Enable export - Filter
• Custom filter
When the chart is selected, it is defined:
- Basic settings
•Title
•Subtitle
• Restoration
•Refresh interval - Advanced settings
•Graph type
•Setting series, axes - Filter
• Custom filter
When a KPI is selected, it is defined:
-
Basic settings
• Title
• Subtitle
• Refreshing
• Refresh interval -
Advanced settings
- Suffix
- Aggregation type
• the amount
• diameter
• median
• count
-
Filter
• Custom filter
¶ CREATION OF NEW USER ROLES AND NEW USERS
¶ Creation of new user roles
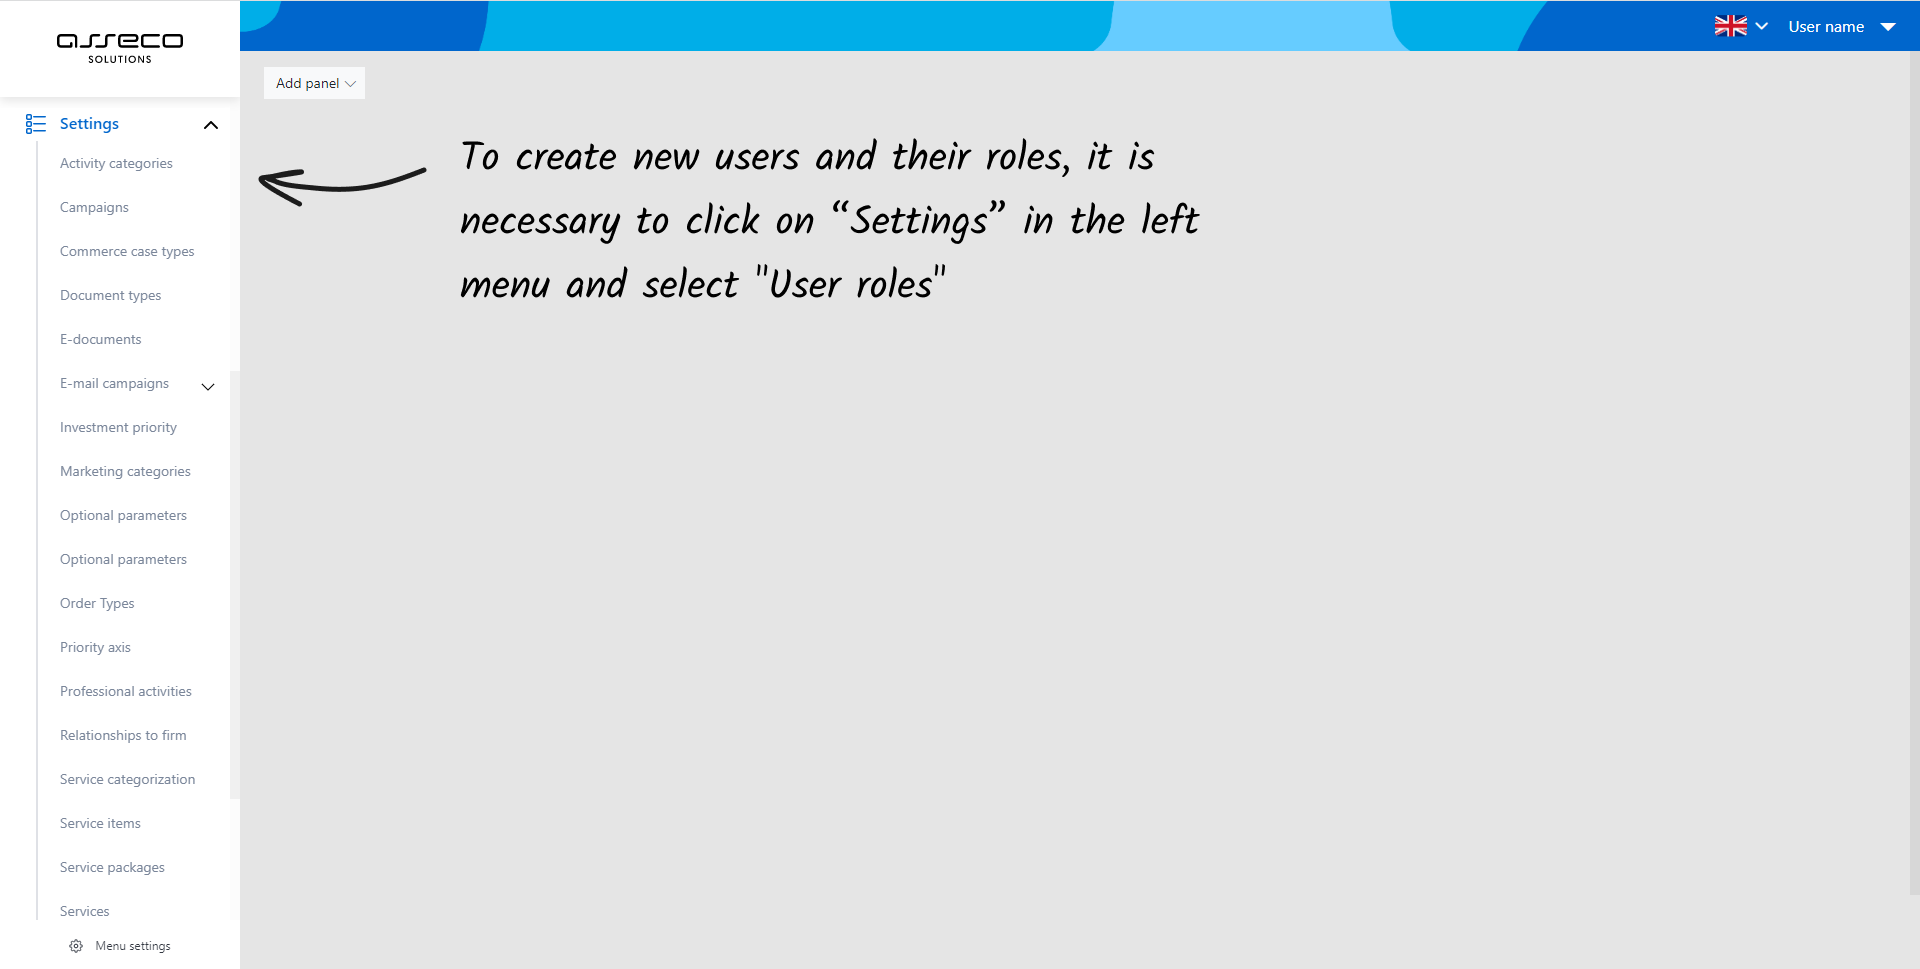
- On the main menu of the application, click on the item "Settings" and then the sub-item "User roles".
- Click the "New Record" button.
- Fill in the necessary information about the new user role, such as name and code.
- In the "Allowed actions" section, select the items to be assigned to the new user role.
- Click the "Confirm" button to confirm the creation of a new user role.
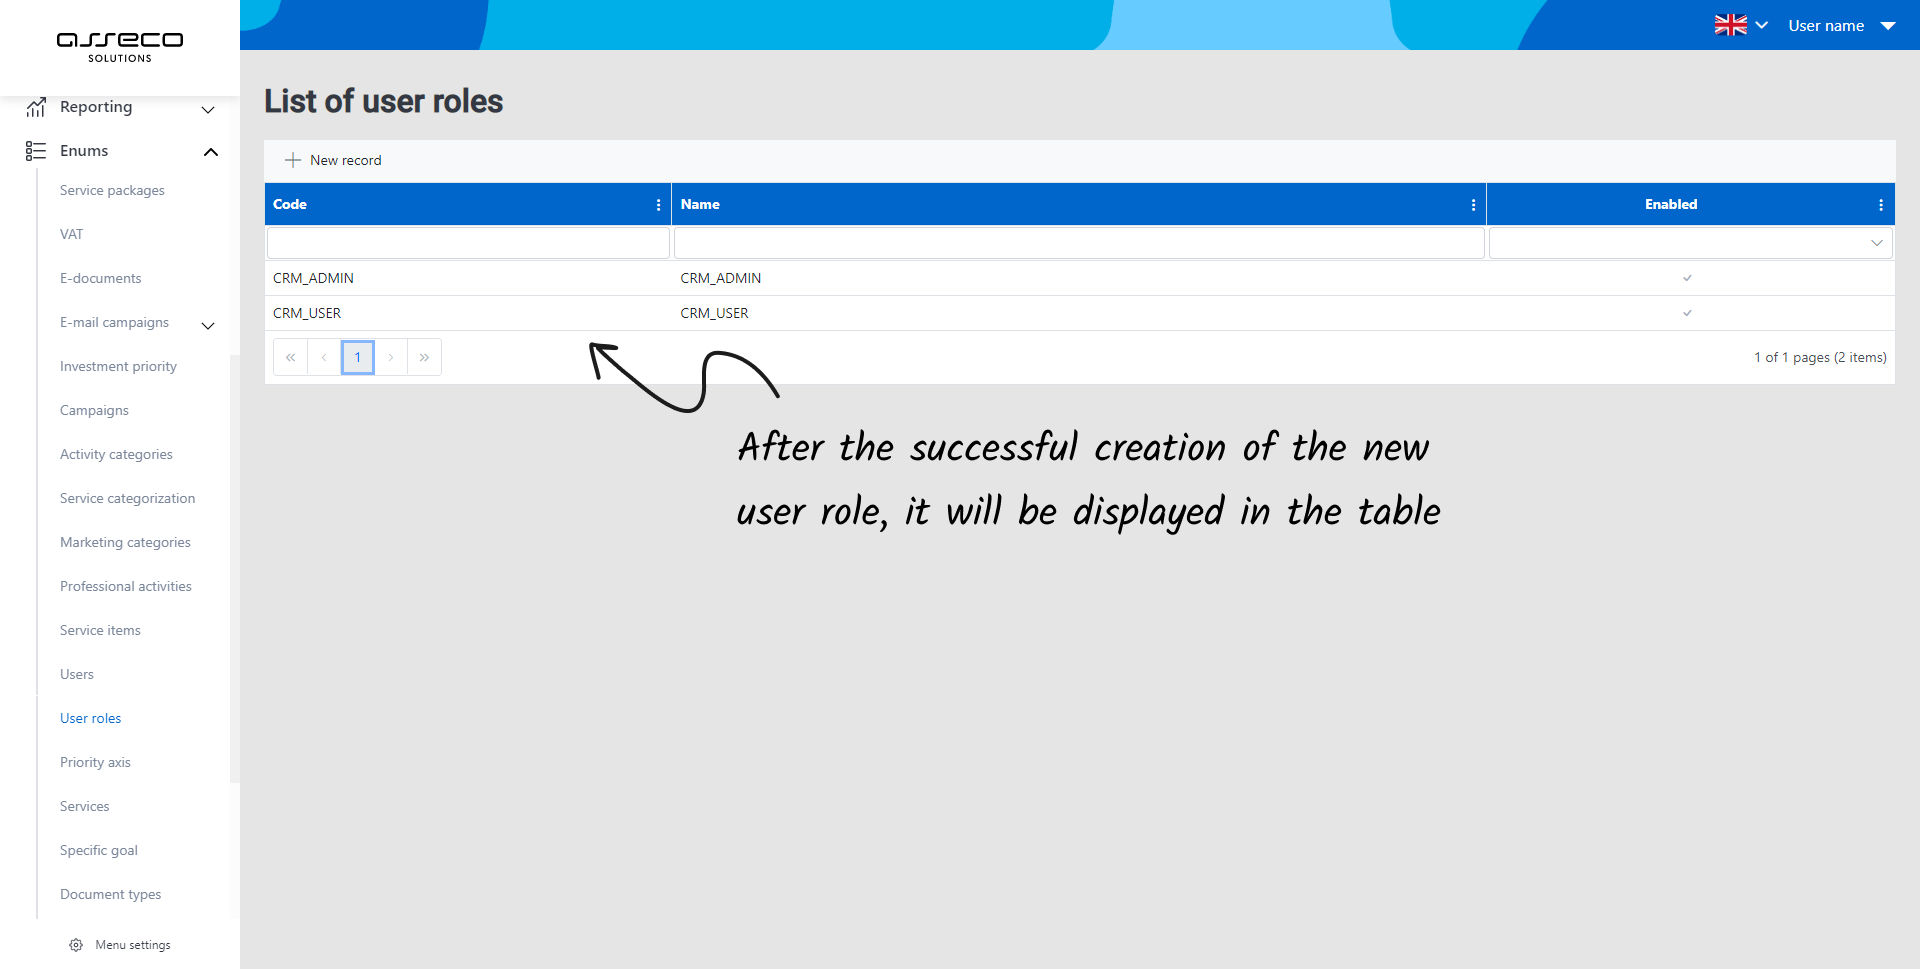
- The new user role should appear in the list of user roles.
.png)
.png)
¶ Creation of new users
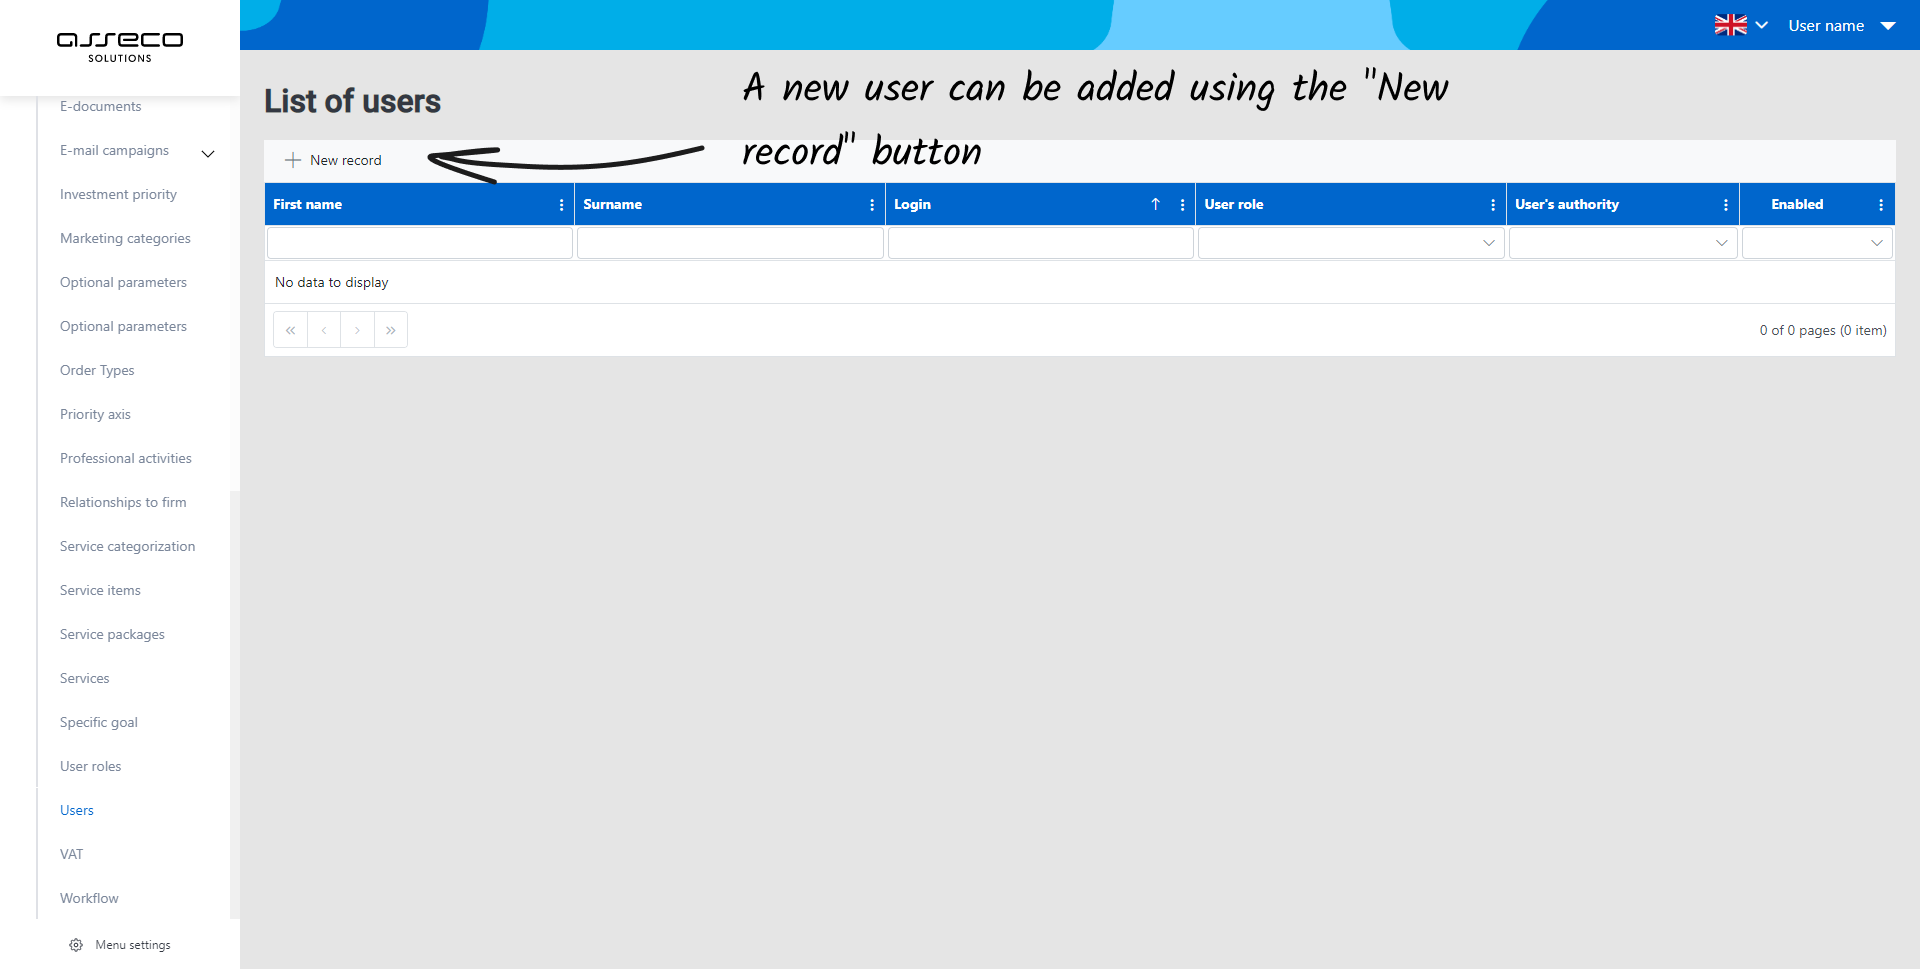
- On the main menu of the application, click on the item "Settings" and then the sub-item "Users".
- Click the "Add New User" button.
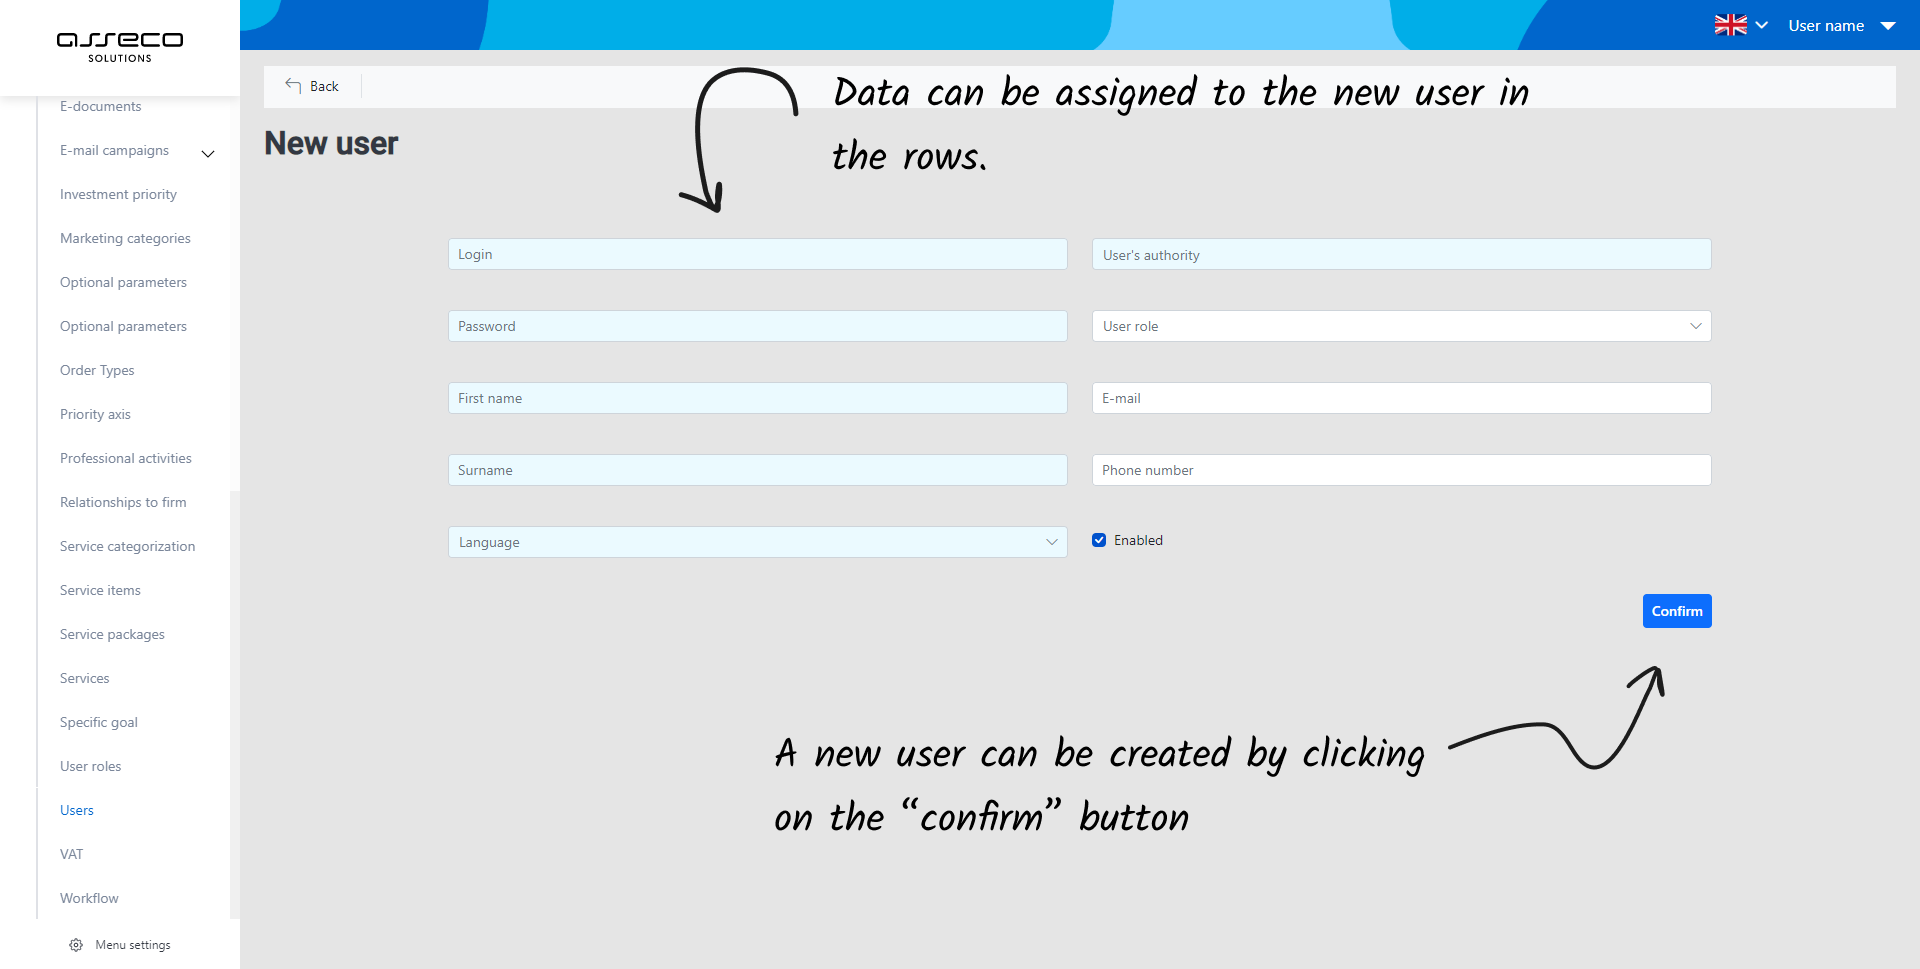
- Fill in the necessary information about the new user, such as first name, last name, email address and password.
- Then click the "Confirm" button.
- The new user should appear in the list of users.
.png)
¶ RECORD OF CONTACTS - CLIENTS
Schematic process of linking between individual Qasida CRM application modules.
.png)
Client records are divided into records of companies (legal entities) and records of persons (natural persons as clients and contact persons with whom leads or business cases are maintained) and records of Leads (potential business cases) in the main menu Contacts.
It is assumed that the records of leads are independent of the records of real business cases (opportunities, deals). The company defined in the lead is not actually stored in the codebook, therefore it may happen that some companies will not actually use leads, but directly OP records, where they will have a specified % of probability for individual states and will calculate the prediction/forecast based on this.
Company is a client who is an entrepreneur, while the legal form is not important.
A Person is a client who is not an entrepreneur. Such a person must have the Client option selected in the Type of person field.
¶ Establishing and recording potential clients - leads
The user creates a new potential client in the main menu Contacts - Leads by pressing the button +New record. Editing of an existing lead is done in the detail of the record (double-click on the basic row in the table) and then through the action Edit lead.
The modal window of the lead consists of tabs Basic data and Extended data, between which the user switches with the Next and Back buttons. In Basic data, the user enters mandatory data - subject, client name, name and surname of the contact person, assigned user and owner, optional data - date of acceptance, campaign, description and contact data, ID number. Parameters, marketing parameters and optional data are recorded in the extended data. The data on this tab is user adjustable. The lead record is saved with the Save button.
The detail of the lead is displayed by double-clicking on the selected entry in the list of leads. WF statuses are displayed at the top of the screen. In the middle part of the screen, the basic data of the lead is displayed. On the right side of the screen, there is information about the owner, the assignee and the date of receipt and creation of the lead, the mutual connection of the lead with the Client (Company or Person) and the contact person and the business case - if this connection already exists.
Buttons on the top bar navigation:
- Back – return to the list of leads in the tabular overview
- Edit lead – editing of an already created lead with the possibility of overwriting or addition of data
- New task – a task linked to a lead can be created with the button
- New Questionnaire – with the button you can select and fill in the questionnaire/s offered in the selector
- New company - creation of a new Contact - Companies from the initials defined in the lead window and linking it to the lead
- New person - creation of a new Contact - Persons from the initials defined in the lead window and linking it to the lead
- New business case – creating a new business case from the initials defined in the lead window and linking it to the lead; a new OP can be created if there is a Contact (company or person - client).
At the bottom of the screen there are individual tabs with additional information:
- Comments tab – the option to add a comment
- Information tab – address, parameters, marketing categories and optional data
- Activities - list of activities in the calendar linked to the lead - date filter is editable
- Tasks - a list of tasks linked to a lead - by double-clicking on the task tile, the user switches to the details of the task
- Documents and Questionnaires – adding and registering documents and questionnaires for a given lead
- History – list of WF status changes on the lead
¶ Establishment and registration of the client - Companies (legal entity and natural person - entrepreneur)
The user creates a client - company in the main menu Contacts - Companies with the New record button in the top bar of the screen or directly in the list of business cases in the main menu Business cases with the Add record - New client - company button in the upper right corner of the screen. Enter the client's ID number in the search field. After entering the ID number, the Search button is activated. After confirming the button, the system searches for the client in the Register of Financial Statements. The searched client is displayed on the screen. The user marks the record with the cursor and opens it with a double click. The system retrieves the data from the reference register and writes them into the Qasida CRM system. Data that are not automatically filled in must be filled in manually by the user. If the user enters an existing ID number, the system will offer the existing record for editing. The record in this case starts with a pencil icon.
.png)
Picture - Existing client
The client can be registered even without searching in reference registers. In this procedure, in the Company form, the user does not enter the ID number, but confirms the blue New Company button. The system opens a form for manual data entry.
The New Firm form is made up of Basic data, Extended data and Other data tabs. Use the Back and Next buttons to move between tabs. Mandatory data in the basic data are the fields name, street?, ID number, legal entity, country. There is no mandatory data in the extended data. Other data refer to marketing parameters and categories, which can be set individually. With the Confirm button, the user saves the new client.
Legal entity – when registering a legal entity, select the legal entity option. When registering a self-employed person, select the option individual entrepreneur. With this option, the First and Last name fields are displayed, the first and last name of the entrepreneur is entered. The address is entered if it is different from the place of business. From the data defined in the legal entity section, a person of the person type with the owner relationship is automatically created in the Persons tab and in person contacts (the owner system relationship must be established in the Relations to the company code list).
After saving the client registration, the Client Detail is displayed. Tabs in the Client detail are described below.
¶ Establishment and registration of a client - a natural person, not an entrepreneur
The user creates a client - persons in the main menu Contacts - Persons by pressing the New entry button in the upper bar of the screen. A new person can also be created directly in the list of business cases in the main menu Business cases by clicking on the button Add record - New client – person in the upper right corner of the screen. The search field is not currently linked to the register of natural persons, the person can be entered manually with the New person button.
The New person form is composed of the tabs Basic data, Extended data and Other data. You move between the tabs with the Back and Next buttons. Mandatory data in the basic data are the first name, last name, and state fields. There are no mandatory data in the extended data, but it is important to enter the Person Type. If the user creates a client person, he selects the Client person type. Other data refer to parameters, marketing categories and optional data that can be set individually. With the Confirm button, the user saves a new client - person.
After saving the client's registration, the person's detail is displayed. Bookmarks are described in the next chapter.
In the Contacts - Persons list, the client record has the type Client displayed in the Person type column.
¶ Registration of Data on the Client's tabs
Actions in the upper part of the detail of the company or person record
- Back – return to the overview of companies/persons in the tabular view
- Edit – editing of an existing record, possibly adding data
- Action – additional actions on the record, e.g. e-document generation
Bookmarks at the top of the company or person record detail
- Summary tab – basic contact and identification data
- Detail tab - Other data - display of marketing parameters and categories
- Persons/Companies tab – the tab defines persons assigned to companies or companies assigned to persons on the person detail. In the case of a company, it is possible to create a new person directly from this tab with the button Actions - New record or the button Actions - Add an existing person. A valid person is marked with a green hook, an invalid one with a black one. The contact person is marked with a person icon.
- Documents and questionnaires tab – records of documents and questionnaires in the task types Fill in the questionnaire
Bookmarks at the bottom of the company or person record detail
- Comments tab – possibility to add a comment
- Activities tab – records of activities for the client – activities defined in the Calendar section
- Tasks Tab – list of all tasks for the client
- Business cases tab – a list of the client's business cases and the possibility to enter a new business case directly from the client's details
- History tab – records of workflow status changes
.png)
Picture - People on the client
¶ Records of persons to the company
For clients - companies, it is possible to register persons related to the client. Relationships are defined in the Relationships to the Company code. Persons to the company are registered on the Persons tab in the Contacts - Companies detail. The user uses the Actions - New record button to add an existing person or the Actions - Padd new person button creates a new person with the person type - person. A valid person is marked with a green hook, an invalid one with a black one. The contact person is marked with a person icon.
A new person can also be created in the Contacts - persons menu with the New entry button. The difference compared to the establishment of a person - client is in the type of person on the second tab, extended data. The person assigned to the company has the person type in the Person type field.
Všetky osoby zadefinované v systéme sú evidované v zozname Kontakty – Osoby a v stĺpci Typ osoby majú typ Osoba.
¶ BUSINESS CASE ESTABLISHMENT AND RECORDS
Business cases are registered and managed in the main menu Business cases (OP). It is possible to add/hide individual columns in the OP list with the Columns button in the upper right part of the report. Records can be sorted ascending/descending by clicking on the column name, adjust the column width. Marketing categories allowed for OPs can be set as columns in the OP list. The Last Activity column shows the number of days when there was no activity related to the OP. In the header of each column there is a field for entering a value for filtering according to the given column. After entering a value in the field for filtering, it is necessary to confirm enter. Filtering by columns can be combined, i.e. j. enter a value to filter multiple columns at once. The filter remains remembered according to the logged-in user.
The user defines the extended filter with a button .png) . The filter can be named and saved. The active filter is colored blue.
. The filter can be named and saved. The active filter is colored blue.
The user creates a new OP with the button Add record - New business case in the upper right corner of the screen. The OP modal window consists of three tabs – Basic data, Extended data and Items.
- Basic data tab - the user selects an existing client, enters the OP name, selects the OP type - the OP type determines the WF statuses, selects a campaign from the code list, enters the probability of OP success - this probability expresses the trader's subjective opinion on a specific OP, enters the expected amount for the given OP , the optional data are – the opening date and expected end date of the OP and a description.
- Extended data tab - the user enters marketing categories, parameters and optional data - all data is user adjustable, i.e. the user of the system sets which of the listed data groups he will record and at the same time creates his own code in the given data groups. The user defines the items of categories, parameters and optional data and their obligation/optionality in the relevant code lists.
- Items tab – on this tab, the user defines the specific items that make up the OP. He selects items from the list of service items, where sales prices and VAT rates for the item are also defined. For each item, it is possible to define a discount for the given OP. The system calculates the OP price without VAT and with VAT.
In the event that the user creates a new OP for a client who is not yet registered in the system, it is possible to proceed as follows: from the OP overview, create a new client with the button Add record - New client - person or New client - company and in detail of the client in the Business cases tab with the New business case button creates an OP for the given client. In this case, the name of the client will be filled in on the first tab.
The OP can be edited in the detail of the record with the Edit business case action.
OP detail is displayed after double-clicking on a line entry in the OP list. WF statuses are displayed at the top of the screen. In the middle part of the screen, basic OP data is displayed. On the right side of the screen, there are information about the owner, the assignee, the opening date of the OP, the expected end date and the date of creation of the OP. The right bar shows the Expected amount according to the merchant, the total amount of OP items, the probability of ending the OP according to the merchant and the probability of ending according to the WF status (it is set in the WF dial to the given status). The indicator weighted average and weighted average by state are calculated. The indicator is calculated as the product of the expected amount and the probability percentage by trader/ by state.
Buttons on the top bar navigation:
- Back – return to the list of leads
- Edit business case – editing or adding data to the existing business case
- New task – the button can be used to create a task linked to the OP
- New Questionnaire – with the button you can select and fill in the questionnaire/s offered in the selector
- Action – additional actions on the detail of the OP record, e.g. e-document generation
At the bottom of the screen there are individual tabs with additional information:
- Comments tab – possibility to add a comment
- Information tab – information entered on the Extended data tab is displayed - parameters, marketing categories and optional data
- Items tab – display of items and a summary of OP items
- Activities - list of activities in the calendar linked to the OP - date filter is editable
- Tasks – list of tasks linked to the OP – by double-clicking on the task tile, the user switches to the task detail
- Documents and Questionnaires – adding and registering documents and questionnaires to the given OP
- History – list of WF status changes on OP
¶ TASKS
Tasks can be created directly in the list of tasks in the Tasks menu. If it is to be linked to a Lead/OP, it can be created from the detail of the business case and from the detail of the lead with the New task button on the top bar. The last way to create a task is to create it in the CRM Calendar - main menu - Calendar and double-click on the selected date and time. Tasks acquire a state according to the task type and the states defined on the workflow of the given task type in the Workflow code.
The task modal window consists of the tabs Basic data and Advanced data. The user moves between tabs with the Next and Back buttons. After saving, the Task Detail will be displayed.
Task creation - the task created in the OP or lead detail is automatically linked to the client and the business case/lead. The user selects the task type, priority - high, medium, low, enters the task name and assigns the user. If the user creates a task from the task overview, it is necessary to fill in this data manually. If the given task is not to be linked with the client, it is necessary to confirm the check box Internal - in this case, the field for selecting the client will not be available. On the Extended data tab, the user enters the solvers for the client, the dates when the task will be solved and the deadline for completing the task. These dates are displayed on the task header tile in the task list or in the Tasks tab in the OP/lead detail. If the task is of the type Fill in the questionnaire, it also completes the questionnaire from the list of questionnaires. The data on the Advanced data tab is optional. The task owner is the user who created the task. After saving the task window, the task detail is displayed.
¶ Task Detail
After saving a new task, the task detail is displayed. The task detail is also displayed when editing the task, by double-clicking on the task tab in the task list Main menu – Tasks. The workflow statuses are displayed in the upper part of the task detail. In the middle part of the detail, the data is entered in the modal window. On the right side of the screen, the Deadline for solving the task, the owner of the task and the assigned solver are displayed.
Top navigation bar actions:
- Back – return to the main task list screen
- Edit record - data editing or adding data to an already created task
- Assign - serves to assign and change the owner and solver of the task, the so-called assigned user.
- Fill out the questionnaire - the button is displayed in the top bar if the task is of the type Fill out the questionnaire, at the same time the user to whom the task is currently assigned is logged into the system and the task is in the worflow state on which the given action is defined . If the task does not have an assigned solver or another user is logged in to the system, and this user displays the task detail, the button is not displayed for the given task type.
.png)
Internal task
In the Basic data tab, it is possible to confirm the Internal task check box. In this case, the fields are changed so that the Client, Business Case and Client Solvers are not accessible.
At the bottom of the task detail screen are tabs with the option to add additional information:
- Comments tab – you can add a comment to the task with the Add comment button. In the Workflow settings, it is possible to set a mandatory comment when changing the task status. The last comment in the sequence can be sent in an email notification using the tag #foreach($taskComment in task.taskComments) #if(foreach.last) $taskComment.text #end #end
- Documents tab – uploaded documents are stored in the tab. Documents are uploaded directly in this tab with the New entry button. The user enters the type of document - e.g. contract, quotation, attachment. Document type is a required field. In the Browse field, the user downloads the desired document in any format. The Add button saves the document to the given task.
- Questionnaires tab – completed questionnaires in the Qasida CRM system are displayed in the tab. The questionnaire is displayed in the task type Fill in the questionnaire.
- History tab – workflow status changes are displayed in the tab – date and time of the change and information about who made the change.
¶ Overview of created tasks
Tasks linked to the client are displayed in the Client detail in the Tasks tab. Tasks linked to the client and to the business case or lead are also displayed in the details of the OP/lead in the Tasks tab. Double-click on the task tile to display the task detail.
The list of all tasks is in the Tasks overview, which is accessible from the main menu on the left side of the screen. Tasks in the report can be filtered according to Owner filters - tasks that are assigned to the logged in user, Owned - of which he is the owner, Unsolved or All my tasks, by type of task, by *expression in the name of the task * and according to status active, terminated, all. User can view the details of individual tasks by double-clicking on the selected task.
-
Editing the task - the task can be edited in the details of the task with the Edit record button. The button is located in the top navigation bar. Icons for individual task types are set in the Workflow list.
-
Automatic shifting of the task status - shifting to the final status can be automatic - it is set in the Workflow dial. In the field Status after solving the task, the state in which the task should be after solving is set. The state after solving the task is set to the state in which the Allowed actions for solvers are set - Fill out the questionnaire
-
Notification when the task status changes - Email notifications are set when defining the workflow in the Workflow dial. The detailed setting is described in the chapter Numerals - Worflow.
¶ SCHEDULE – ACTIVITY PLANNING
In the Calendar section, it is possible to schedule activities: meetings, phone calls, e-mails and tasks. The user marks the selected term by dragging the cursor or double-clicking in the calendar time zone, a menu for choosing an activity will appear. The user completes the operation. After selecting an activity, the system adds all the data - place, date and time to the activity detail.
.png)
Picture - Planning and activities in the calendar
The user fills in the name and category of the activity - mandatory data and other data: client, business case, mandatory and optional participants and source as needed. When entering participants, the system searches in the list of users and in the list of persons. After entering a character in the field, the user waits for a while and the system offers him options to choose from. If a resource is reserved, its reservation will also be reflected in the reservation calendar. To reserve resources, it is necessary to have a defined resource code in the section Event and resources - Codes - Resource types and Resources. After saving, the activity will appear in the calendar.
By double-clicking on the selected activity, a detail record will open, where in the upper part there is an option to switch the status of the activity in the form of a workflow. The colored state is the current state. You can add information to the activity in the Comments and Documents tabs, the Sources and Items tabs are non-editable and display information about the source and the price per item.
¶ RESOURCES AND EVENTS RESERVATIONS
¶ creating reservations - calendar of resources
Before creating the reservation itself, it is necessary to define reservation categories, operations, resource types and resources. Resources can be assigned to an operation, in which case they can only be reserved for that operation. If the resource is not assigned to an operation, it will be possible to reserve it for all operations.
The reservation itself is created in the section Events and resources - Calendar of resources. In the resource calendar, the user filters the resource display by operation, resource system type, and resource type.
The calendar can be displayed as a daily schedule, a weekly schedule, an agenda divided by resource types and individual resources, or a monthly agenda can be viewed. With the arrows in the upper left corner, the user moves in time according to which report is turned on. The Today button returns the report to the current day, if the report is displayed outside of the current day.
The user selects the required resource on the required date in the resource calendar, and after clicking on the calendar, a menu appears in which the resource and the date and time are defined, these can also be changed in this step. The values are filled in the reservation details. Three types of reservation can be selected:
- Event – green color – the resource is reserved for the event and will also be displayed in the event calendar, the event can also be defined via the event calendar – resources are not automatically filled in this case.
- Reservation - turquoise color - the values are filled in the Basic data of the reservation detail, the user fills in the reservation status, mandatory data, event category, name, client and description, optional data. Press the Next button to move to the items tab, where the items are automatically filled in according to the values from the resource list. The reservation item can be edited, deleted, or added. The Save button will save the reservation.
- Resource blocking - blue color - the values are filled in detail, the user fills in the type of resource blocking - unavailable, out of order.
The resource itself is displayed in the lower part of the window and will also be displayed with the price after clicking on the tile. It is possible to add additional resources in the blue line with the Add button, thus reserving more resources for the same time for one client in one step.
By double-clicking on a saved reservation in the calendar, the user opens the details of the reservation. In the upper part, there are workflow statuses: unconfirmed, confirmed, implemented, not implemented, cancelled, rejected. Confirming the status button scrolls the status. In the lower part of the screen there are tabs Comments, Documents - it is possible to add new records, tabs for displaying sources and items cannot be edited directly in detail. The details of the reservation can be edited with the Edit button at the top of the form. In the right part of the form, information about the reservation is displayed: Date and time of the reservation, Creator of the reservation and time of creation of the reservation, Duration of the reservation, Price of the reservation (price x number of items).
.png)
Picture - Resource calendar

Picture - Reservations in the resource calendar
.png)
Picture - Resource reservation
¶ Events
The user can also create events in the separate section Events and resources - Events. The list of events can be viewed as a monthly overview or a monthly agenda. In the monthly agenda, the list of events for the selected day is displayed below the calendar - the name, venue and time of the event are displayed.
The user creates an event by double-clicking on the selected day in the calendar. The event entry window consists of tabs, which can be moved between with the Next and Back buttons:
- Basic data
- Description
The details of the event are displayed after double-clicking on the event displayed in the calendar - List of events.
¶ QUESTIONNAIRES
The questionnaires module serves to obtain initial information, feedback, or to find out the necessary information related to a lead, a business case, or a customer. The questionnaire can be created in two ways:
- in the Questionnaire menu – List of questionnaires – with the button New record. The user creates new questions directly in the questionnaire.
- by creating questions in the Question Editor section and then assigning these questions to new or existing questionnaires.
¶ Question editor
All existing questions can be found in the Questionnaire - Question Editor menu. New questions need to be created with the New record button, but first you need to create at least one category into which the questions will be subsequently stored, e.g. Approvals category, Persons authorized/authorized to act on behalf of the applicant category, First discovery meeting category, Customer satisfaction category, etc. User enters code and category name, ticks Enabled. If an existing category code is entered, the record is edited. After marking the selected entry in the Categories overview, questions belonging to the given category will be displayed in the Questions section.
In the Questions section, the user creates the questions themselves with the New record button. If a category entry is marked in the Category section, this category will be automatically filled in when creating a new question. If the category is not marked, it must be selected from the list. The question code is checked within the given category, if an existing code is used, the system alerts the user with a red notification in the code field. In the Question type field, the user specifies what type of answer is required within the given question. Choose from options:
- one answer - exactly one answer from the given options must be selected in the answer. The user creates possible answers in the List of possible answers window with the New record button. The answer code is checked within the given question.
- more answers - more answers can be selected from the given options in the answer. The user creates possible answers in the List of possible answers window with the New record button. The answer code is checked within the given question. In the Number of responses field, the user defines a max. number of possible answers.
.png)
Picture - Question More answers
.png)
Picture - Question More answers in the questionnaire
- text – the required answer is text, the minimum number of characters used in the answer can be defined by the user, the maximum number of characters is system-wide, namely 2000 characters,
- number – the required answer is a number,
- email - the answer is an email address, the system checks the form of the address.
.png)
Picture - Reply type e-mail
- file - the answer is to add a document,
.png)
Picture - Question of type File
- participating persons – the name, surname and relationship of the participating persons are added in the answer, the participating person is indicated,
- contact person – persons who are connected to the client are automatically allowed in the answer, the email and phone number are listed. The contact person can also be added directly in the questionnaire,
- date – the answer is a date, the date can be entered manually or selected from the calendar, the format of the answer is checked,
- date and time - the answer is the date and time, the date and time can be entered manually or by choosing from the calendar and time dial, the format of the answer is checked
.png)
Picture - Date and Datetime responses
In the Mandatory field, the user indicates whether the given question requires a mandatory answer. If the answer is not entered, the system will not allow the questionnaire to be saved. In the Use in questionnaires field, it is possible to select the questionnaires in which the created question should be used. If the questionnaire is not created at this stage, the Use in questionnaires field is not filled out. The moment a question is added to a new or existing questionnaire, the field is filled automatically.
¶ Questionnaire
The user creates a questionnaire by pressing the New entry button, edits an existing questionnaire by double-clicking on an existing entry. In the list of questionnaires, it is possible to filter by code, name, status, user who created it, creation date and whether the questionnaire is enabled or disabled. It is possible to set workflow statuses for the questionnaire, e.g. preparation - active. The questionnaire consists of three tabs.
Basic data tab: the user fills in the code and name, the code must be unique, and the system will notify him if the given code already exists. The fields Created by user, Last modified, Date of creation and Date of last modification are filled in automatically by the system. The Header, Introduction, Conclusion, Footer, and Note fields are optional and serve for additional notices and information needed to fill out the questionnaire. Enabled must be checked for active use.
**Question tab in the questionnaire: **this section defines the questions that the questionnaire will contain. The overview shows the questions that the questionnaire contains. The order of questions can be changed by moving the cursor, grabbing the icon. With the icon, questions can be selected from the questionnaire. Questions are added with the Actions button.
Actions - New entry – by selecting the option New entry, the user creates a new question directly in the questionnaire. The Use in questionnaires field is filled automatically with the currently created questionnaire, additional questionnaires can be added.
Actions - Adding questions from existing questionnaires – by choosing this option, the user can add a question to the created/edited questionnaire from already created questionnaires. In the Questionnaire field, select the desired questionnaire, and in the Questions field in the questionnaire, select the questions from the selected questionnaire, these are divided by category. The Add button adds the marked questions to the questionnaire.
Actions - Add questions by category - by selecting this option, the user can add a question directly from the category. In the Questions by category field, select either the entire category or individual questions from different categories. The Add button adds the marked questions to the questionnaire.
Actions - Adding questions from existing questions – the system will offer all questions without categorization for selection.
.png)
Picture - Options for adding questions to the questionnaire
The tab: Answers to the questionnaire shows the results of completing the questionnaire with the identification of the client, the date and time of completion in the upper part and the answers to individual questions in the lower part.
¶ REPORTING
The module is used to display created reports that are based on the data created in individual records of the CRM application, namely:
- Leads
- Companies
- Persons
- Tasks
- Calendar - activities
- Business cases
Reporting enables the aggregation and display of data from other sources, not only from the Qasida CRM application. In this case, it is necessary to define sources, variables, connections and types of reports in the menu Reporting - Sources.
¶ CODE LISTS
In the following section, we present the dials that need to be set before using the application itself.
¶ Roles and permissions
The User roles directory contains a list of all user roles, these items go directly into the Users directory, which we will explain in the next chapter.
Adding a new user role is done via the button + New record.
We fill the fields Code, Name and Status with the necessary data, while all fields are mandatory. To actively use the created role, it is necessary to check the Enabled box.
Editing and deletion of an existing entry in the User Roles list is carried out by double-clicking on a specific entry in the codebook using the buttons Delete entry or Confirm if we've made any changes.
Authorizations of user roles - it is necessary to define allowed actions for the roles - reports to which the user will have permission after assigning the given role. The permission is implemented by checking a specific module, or submodule.
¶ Users
The Users directory contains a list of all specific users working with the system. User role and user authority are assigned to the user. A user can have multiple authorities assigned at the same time. It is also possible to edit the login data for individual users.
Suggestion of setting user roles:
User authorities:
- Administrator – the authority has access to all overviews, including Reporting section, it is not necessary to assign any role to the user, or it is possible to assign the administrator role, which has all overviews enabled. The second alternative is important if we need an administrator who will also have all Workflow (WF) statuses enabled, as long as this role is set in WF.
- Reporting administrator – the authority has access only to the Reporting section.
- User – the authority has access to the reports according to the assigned role within which the allowed reports are assigned.
- Demo user for Asseco CRM – used by users for the demo version.
Adding a new user is done via the +New record button. The Login Name, User Authority, Password, First Name, Last Name, Language and Status fields are filled in, and these fields are mandatory. Optional fields are User Role, Email and Phone Number.
Editing and deletion of an existing item in the Users list is performed by double-clicking on a specific item in the table using the buttons Delete entry, or Confirm if we have implemented any changes.
¶ Creating a user through Identity Access Management (IAM)
If authentication via IAM is set, the new user enters the password himself. The administrator creates a new user in CRM and fills in a valid user email. A link is sent to the email, through which the new user enters his password and will then be redirected to the application.
¶ Marketing categories
The list serves to supplement the individual information needed for a specific client. It can be the definition of a segment, credit rating, industry, or any additional information that is to be structured and the company is required to fill in this information, or this information helps to facilitate trading.
In the Marketing Categories (MK) codebook, two specific lists are filled in, namely Types of Marketing Categories and their associated Marketing Categories.
The user adds a new Marketing Category Type via the New Marketing Category Type button and fills in the Code, Name, these fields are mandatory.
It is possible to select another type of MK as the parent type and thus build a tree structure of entry of MK. The marketing category can be enabled for records of person and client type, for records of companies, business cases and leads. The given category can only be recorded on enabled reports on the Extended data or Other data tab.
The user can edit and delete an existing Marketing category type record by double-clicking on a specific record in the code list using the buttons Delete record, or Confirm if it implements any changes.
A marketing category always belongs to a specific type of marketing category.
The user adds a new marketing category via the New marketing category button, where he fills in the Code, Name. By default, the marketing category type is filled in according to which type is selected before creating a new category.
The serial number of the marketing category determines the order of display on the tab Other data or Extended data of the relevant record in the set module.
¶ Optional parameters
The list of parameters serves rather to define the characteristics of either a company or a person as such - the information is displayed in the form of a "tick box", e.g. solvent company, smoker, etc.
In the Parameters list, two specific numbers are filled in, namely Parameter Types and the Parameters associated with them.
The user adds a new parameter type via the New parameter type button and fills in the Code, Name and Status data, while all fields are mandatory.
The user can edit and delete an existing record Type of parameter by double-clicking on a specific record in the code list and using the buttons Delete record, resp. Confirm if it implements any changes.
A marketing parameter always belongs to a specific type of marketing parameter.
The user adds a new marketing parameter via the New parameter button, where he fills in the Code, Name, permission of the created parameter for a person, company, business case or lead. The given parameter can only be recorded on enabled reports on the Extended data or Other data tab. By default, the parameter type is filled in according to which Parameter type is selected before creating a new parameter.
¶ Optional data
The list is used to individually supplement the necessary information for a specific client. It can be the definition of the manager's favorite bottle of wine, his favorite company, the name of the person who made the recommendation with the option to set that it is mandatory data, the addition of follow-up data, or any additional information that should be structured and that the company is required to this information was filled in, or this information helps to make trading easier.
Optional data are user-entered fields in which data must be recorded and which can be changed by the user. New optional data is entered with the button +New optional data, where we fill in the code, name and number, which are mandatory data. The sequence number as an optional data determines the order of the display, and the default value speeds up the filling of the required data.
The given optional data can only be recorded on enabled reports on the *Extended data *or Other data tab.
¶ Relations with the company
The Relationships to the Company code allows you to define a list of relationships of persons to the company, or roles with which the company has established contacts, such as business director, financial director, etc. according to the individual requirements of the company.
Relationships are established on persons connected with the client - the company. The user adds a new record with the button +New record, where he fills in Code, Name, System type.
To actively use the created relationship, it is necessary to check the Enabled box.
Editing and deletion of an existing entry in the Relations to the Company codebook is carried out by double-clicking on a specific entry in the codebook using the buttons Delete entry, or Confirm if we have implemented any changes.
¶ Types of document
In this list, the types of documents that will be set up within the CRM application are set. Defined document types are added in individual CRM modules (Leads, Contacts, Business cases, etc.) on the Documents tab.
The user adds a new type of document via the New record button, where we fill in the Code, Name and Status fields, all of which are mandatory.
The user can edit and delete an existing record in the document types list by double-clicking on a specific entry in the list and using the buttons Delete record or Confirm if we have implemented any changes.
¶ Types of business cases
The list is used to distinguish types of business cases (OP), within which different workflow states can be set with other actions and events set in the background.
A new OP type is created using the New business case type button, where we fill in the fields Code and Name and Workflow Type as mandatory data. To actively use the created OP type, it is necessary to check the Enabled box.
The user can edit and delete an existing entry in the list of types of business cases by double-clicking on a specific entry in the list and using the buttons Delete entry or Confirm if we have implemented any changes.
¶ Types of Orders
The list is used to differentiate the types of orders, within which different workflow states can be set with other actions and events set in the background.
A new order type is created using the New order type button, where we fill in the fields Code, Name, Prefix (it is part of the order number) and Workflow Type as mandatory data. To actively use the created order type, it is necessary to check the Enabled box.
The user can edit and delete an existing entry in the Order Types code list by double-clicking on a specific entry in the code list and using the buttons Delete record or Confirm if we have implemented any changes.
¶ Campaigns
In Asseco CRM, it is possible to assign and then evaluate Leads and Business cases according to set campaigns.
The user adds a new type of campaign via the New campaign button, where we fill in the fields Code and Name, which are mandatory, and Date from and Date to, which are optional and only serve to add the duration of the campaign. To actively use the created campaign, it is necessary to check the Enabled box.
The user can edit and delete an existing entry in the Campaign directory by double-clicking on a specific entry in the directory using the Delete entry button, or Confirm if we have implemented any changes.
¶ Categorization of activities
This list is used to define the categories of activities that are necessary for the correct creation of an activity (task, meeting, phone call or email) in the calendar.
The user adds a new type of category via the +New record button, where we fill in the fields Code and Name, which are mandatory, and then by ticking, we identify in which type of activity (meeting, phone call, email) the created category will be used.
Individual types of categories can be distinguished by color, which is what the Color selector is for.
To actively use the created category, it is necessary to check the Enabled box.
The user can edit and delete an existing entry in the Activity Category codebook by double-clicking on a specific entry in the codebook using the Delete entry button, or Confirm if we have implemented any changes.
¶ Items of services
The Service Items list contains all specific items for business cases. The items are assigned a unit price and a VAT rate.
We add a new service item via the New service item button. The Code, Name, Price, VAT Rate, Item Type and Status fields are filled in, while all fields are mandatory.
The user can edit and delete an existing record of Service items by double-clicking on a specific record in the codebook and using the buttons Delete record, resp. Confirm if he implemented any changes.
¶ Workflow list
The Workflow (WF) list contains a list of work procedures above individual reports that need to be set up before the actual work in the Qasida CRM system.
Workflows are defined for business cases, tasks, companies, people and leads. E-mail notifications for solvers can also be defined in the workflow.
To add a new workflow, you need to select the New entry button in the List of workflows overview, select the Type of workflow from the selector and confirm the Create a procedure button.
In workflow, it is necessary to define:
- Workflow type
- Name of the workflow type
- Workflow type code
- Description
- Color
- Or an icon (tasks).
For active use, the created procedure must be confirmed with the Enabled button.
When defining a workflow for a task, you must also specify the task type. Each type of task has its own number series, which is indicated by the code of the task type, name, as mandatory data. For each type of task, you need to select a color code and icon for better clarity in the task list. Defined task types are subsequently displayed in the task type selector when entering a new task from the detail of a business case, lead or directly in the task overview.
When defining a workflow for a business case, the type of business case must also be specified. The business case type is defined when a new business case is entered. For each type of OP, a unique workflow can be created that should reflect the trading steps.
Only one workflow needs to be defined for companies, persons, and leads, even if the user does not follow WF on these reports. At least one status must be defined in the workflow.
Task and business case workflows can be copied - states and actions are copied - enabled states and enabled roles are not copied. The copy is made with the Create a copy button in the basic workflow overview.
After establishing the workflow type as described above, it is necessary to define workflow states, actions to be performed in the given state, and email notifications. Any color can be defined for each state. States that can follow the current state are framed by the selected color. Unauthorized statuses for the logged-in user are gray and after marking with the cursor, information appears with the warning Status is not allowed for the current status.
¶ Statuses in workflow
-
Adding status – the user adds the status to the workflow with the button Add record – assigns a code, name and color. It is possible to assign an already existing status from the status list. After confirming the checkbox and clicking in the blue box, the already existing statuses will be displayed. Click on the status to save it in the blue field. In this way, it is possible to select several statuses. With the Confirm button, the new or selected existing states will be saved in the enabled workflow states window.
-
Correction of status - The marked status can be edited or deleted by clicking the Edit record button. You can define your own color for each status.
-
Status setting:
• Sorting of the states in the window determines the order of the state display.
• With individual states in the Enabled States window, it is necessary to define a state that can occur after the current state, that is, to which the state can move. It is necessary to have the status marked in the Enabled statuses window and select the status(es) with which the workflow continues in the Enabled statuses field from the selector.
• In the field User roles, it is necessary to select from the selector the roles for which the status in the field Allowed statuses is enabled. If the status is not enabled for a role, this status is displayed in gray.
• End status – the user confirms the checkbox if the status is end, i.e. j. it is not followed by another state. One workflow can have multiple end states, e.g. the Terminated, Rejected, and Canceled states of service are all three end states.
• In the case of a task of the type Filling out the questionnaire, it is necessary to define the Allowed actions of the solvers and the Main action of the solver - select the option Fill out the questionnaire. this setting means that there is a button in the top bar in the task detail Fill out the questionnaire. In the event that the Status after solving the task is set, it will be set automatically after filling out the questionnaire.
•Percentage value – the percentage value of the probability that the business case will be completed successfully is set for the status of the business case. From the percentage value of the status and the expected amount according to the trader, the system calculates the weighted average of the OP according to the status in the OP detail.
• Add action - Add comment - It will be mandatory to add a comment on the marked status - the window for adding a comment will be offered to the user in the task detail, when moving the status to the status on which a mandatory comment is defined (in other workflows, this option is not incorporated, it applies for tasks only).
• Add action - Send e-mail - it is possible to define the sending of e-mail notifications for the internal solver - employee and for the client. The template created in the E-mail campaigns - templates codebook is added to the settings. E-mail notifications can be set for tasks and business cases.
• Create a task - a task will be created on the selected state. The user defines the type of task, priority, description of the task, assigns solvers, or a questionnaire, if it is a task of the type Fill out a questionnaire, the questionnaire is defined separately for the person and the company. If the task is to be solved by all solvers, confirm the check box. When defining the task, an e-document is also attached, which is automatically generated and attached to the task, the document is defined separately for the company and person. Completion date - number of days - enter the number of days to solve the task, the system will calculate the date when the task should be completed. The name of the task will be filled in automatically, and the name of the client will also be filled in during generation.
¶ E-documents
In the case that the company wants to use the same shalbo, e.g. price offer, contract, addendum, or tender documentation, it is necessary to create this document and set it in the e-documents number book.
Adding a new document is done via the New record button. Fields Code, Name, Type of document are filled in, which are mandatory. Other data such as the category type code and the selection of the record above which the document is to be displayed (e.g. person, company, business case, etc.) are used to further specify the display and creation of the document. Using the action Assign DOCX file, a real docx document is assigned to the created record, in which you need to identify wildcards to add, e.g. client name, business case name, items from the business case to the created e.g. price offer.
Examples of brands:
- ${COMMCASE.NAME} The name of the business case
- ${CREATED_BY_USER} The user who generated the document
- ${CREATED_DATETIME} The date and time the document was generated
An already created new E-document record contains the button Preview document. After clicking, we will see a list of Clients, on which we can generate a preview of the document for testing with our E-document template. After clicking on the record, a new window opens with the generated document that used our template.
The user edits an existing record of the document template by double-clicking on a specific record in the code list via the Confirm button, if he has made the change.
The user deletes an existing record of the document template by double-clicking on a specific record in the code list via the Delete record button.
¶ Generation of E-document over the record
We use the created document template in the detail of the record in the records for which we created the template, e.g. business cases, company, persons, etc.
Click on the Action - Generate e-document button in the details of the record (this is only accessible if the record is assigned to the record in the e-documents). All created E-documents accessed for business cases will be displayed. By clicking on one of the possible options, a preview or download window of the E-document with data from the Business Case will appear. Options:
- View - opens a new window with a preview of the document,
- Download – Downloads the PDF document to the computer.