¶ Overview of the Order Manager Application
The Order Manager application features a main menu located on the left side of the screen. This menu includes the following items:
- Dashboard - The Dashboard provides a comprehensive overview of the current status of your orders, invoices, and other key indicators. It is the main page of the application that gathers all important information in one place for quick access and overview.
- Price Lists - In this section, you can manage price lists for various products and services. You can add new price lists, edit existing ones, and set pricing conditions.
- Suppliers - The Suppliers section allows you to manage the contact and business information of your suppliers. You can add new suppliers, edit existing details, and track the history of business transactions.
- Invoices - Here, you can create, edit, and manage invoices for your clients and suppliers. The section includes tools for tracking due dates and payments.
- Clients - The Clients section is for managing information about your customers. You can add new contacts, edit existing ones, and track the history of orders and communication.
- Orders - In this section, you can manage all purchase orders created with your suppliers, as well as sales orders received from your customers. It includes tools for creating new orders, tracking their status, and managing deliveries.
- Products - Here, you can manage the list of products you offer for sale. You can add new products, edit their descriptions, prices, and track inventory.
- Projects - The Projects section will serve for the financial management of projects - costs and revenues over time. Thanks to this functionality, all your key records will be integrated within the Order Manager application.
- Complaints - The Complaints section is designed for managing complaints from your customers. You can track and resolve complaints, manage communication with customers, and document resolved cases.
- Tasks - In this section, you can manage tasks and assign them to your team members. It includes tools for creating, assigning, and tracking task completion.
- Product Returns - The Product Returns section allows you to manage processes related to product returns from customers. You can record returned products, track the status of returns, and manage refunds.
- Requisitions - In this part, you can create and manage requisitions for various internal and external processes. Requisitions can be related to purchases, complaints, or other business operations.
¶ General Functionalities of the Application
¶ Functions over Records
- Adding, editing, deleting, cloning a record
- Filtering, sorting records
- Exporting the list
¶ Working with a Custom Filter
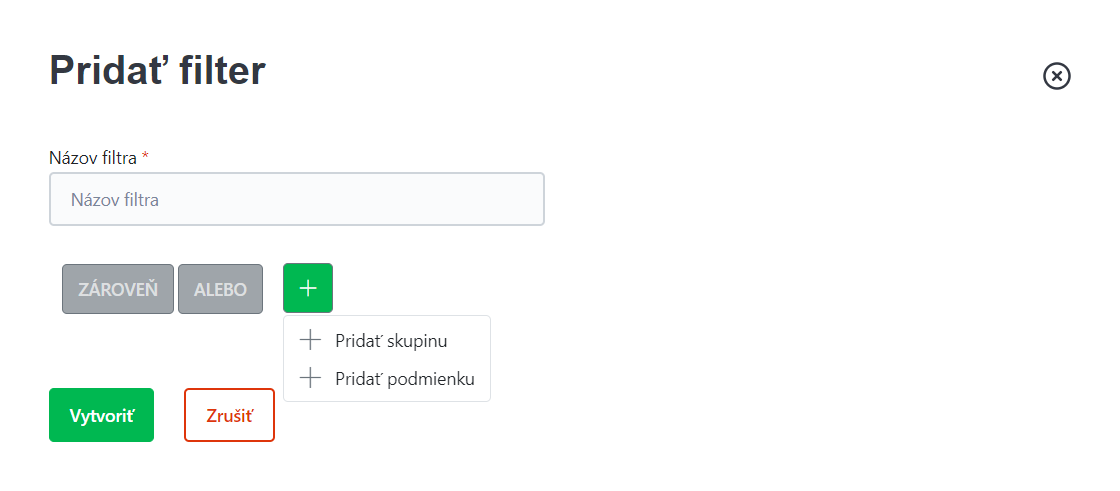
Clicking on the  button opens a window for defining a filter.
Filter Definition Process:
- Enter the name of the filter.
- Click on "+" and choose from the options:
a. Add a condition group
b. Add a condition - Select a field.
- Select an operation from the options:
a. greater than
b. greater than or equal to
c. less than
d. less than or equal to
e. equals
f. not equal to - Enter the value to which the condition is compared.
- Within the group, select the operator (and/or).
- Repeat as needed. By adding more conditions or groups of rules, you can create rules and groups in a hierarchical structure.
-
Clicking the Create button saves the filter. Saved filters are displayed at the top of the window next to the filter definition button. The filter is activated or deactivated by clicking on its name. An activated filter is indicated by green color, and a deactivated filter by gray color. The saved filter can be edited, duplicated, or deleted.
-
To quickly remove all activated filters, you can use the "Reset filter" button.
¶ Sorting Records in a Table
- Clicking on the selected column in the table header allows you to sort the data in the tables in ascending or descending order by the corresponding column.
¶ Common Properties of Records in Registers
- Mandatory fields are marked with an asterisk (*).
- When creating a new record, the form usually contains only mandatory fields. Optional fields are then added in the detail when editing the record.
- In most registers, the basic mandatory fields are Code* and Name*.
- In each register, Comments are optional, i.e., additional notes or comments related to the given record.
¶ Dashboard
¶ Main Features in the Dashboard
The Dashboard in the Order Manager application offers a wide range of features that enable efficient management of orders and complaints, tracking of key performance indicators (KPIs) in real time, and quick access to important and always up-to-date information.
Main features available in the Dashboard:
- Search – Full-text search in purchase orders, sales orders, and complaints, allowing you to quickly find the required data.
- Create – A form that allows you to instantly create a new purchase order, sales order, or register a complaint.
- KPI widgets and charts – An overview of important metrics and statistics, visualized in the form of charts and indicators.
- Onboarding steps – A guided setup wizard that helps new users quickly get familiar with the system's functions.
- Q&A Intelligent Chatbot – An intelligent chat assistant that answers your questions and provides links to the system documentation.
¶ Search Field
At the top of the Dashboard, there is a search panel. Full-text search allows searching through purchase orders, sales orders, and complaints using various criteria, with support for search without diacritics. Search options include:
- Client’s first name
- Client’s last name
- Client’s email
- Client’s phone number
- Company name
- Company ID (IČO)
- Order number
- Complaint number
¶ Create Button in the Dashboard
At the top of the Dashboard, there is a Create button, which serves for quickly creating a new record – a purchase order, sales order, or complaint.
- Create a record – Click the Create button and select the record type – Purchase Orders, Sales Orders, Complaints.
- Fill in the details – In the opened dialog window, fill in the required basic data. Depending on the record type, the fields include:
- Purchase Order: Order type (mandatory), Existing supplier (optional, used to prefill supplier data)
- Sales Order: Order type (mandatory), Existing client (optional, used to prefill client data)
- Complaint: Complaint type (mandatory), Order (optional), Product (optional).
- Save the record – After entering and confirming the mandatory fields, the record will be saved.
- Edit details – Once saved, a form for editing record details is automatically displayed, where additional information can be added.
¶ Price Lists
The Price Lists module is used for recording and managing product prices depending on various conditions, such as quantities, suppliers, or time periods. This module functions as a flexible tool for setting individual prices and discounts, which are automatically applied during sales.
When managing price lists, the following information is used:
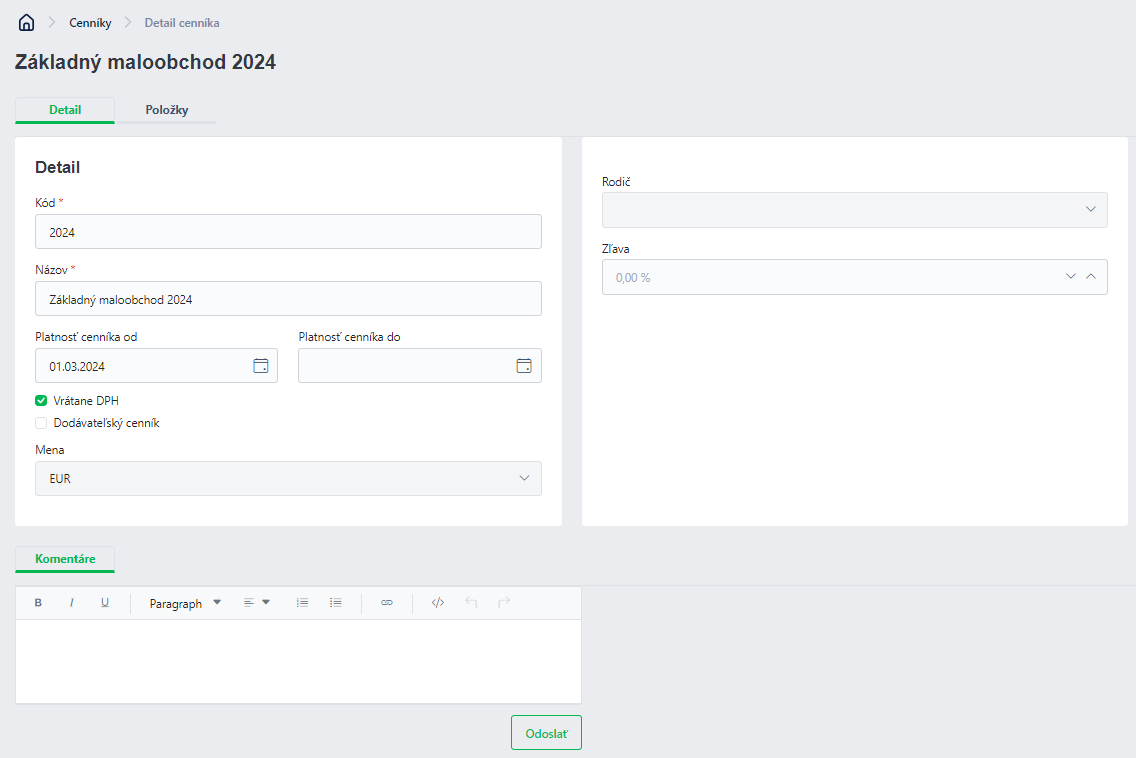
¶ Detail
- Code *: A unique identifier of the price list that allows each price list to be distinguished.
- Name *: A descriptive name of the price list for easy identification.
- Valid from and Valid to: Define the time range of the price list validity. If these values are not set, the price list is valid indefinitely.
- Including VAT: By checking this box, prices in the price list are marked as VAT-inclusive.
- Supplier price list: By checking this box, the price list is marked as a special one for a specific supplier. Once checked, it is possible to link the price list to a specific supplier.
- Currency: Defines the currency in which prices are set (e.g., EUR, CZK, USD).
- Parent: A parent price list from which the current price list can be derived.
- Discount: A percentage discount that can be applied to items in the price list. A discount can only be set on a child price list (derived from the parent list).
¶ Price List Items
- Product category *: The product category, which must be created in the product category registry beforehand.
- Product *: The product, which must be created in the Product section beforehand.
- Quantity from * and Quantity to: Define the minimum and maximum number of units for a specific pricing level. These values enable setting up quantity discounts and tiered pricing.
- Price without VAT *: A mandatory field specifying the product price without VAT.
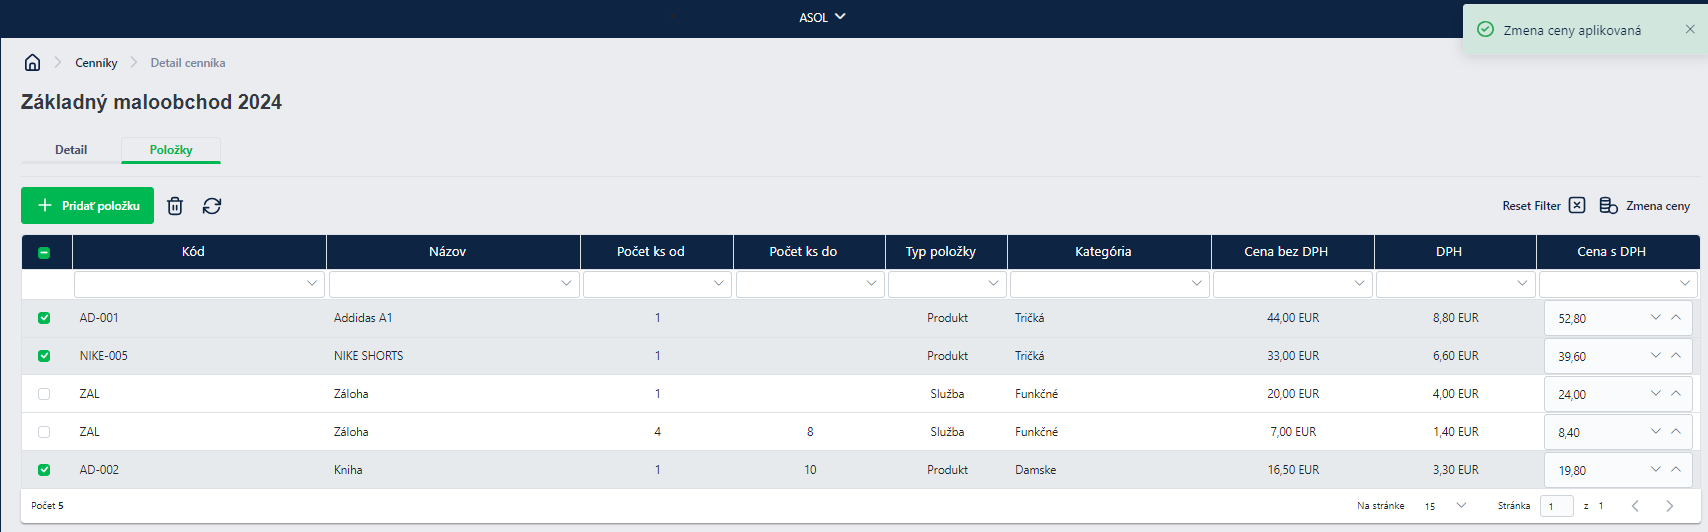
¶ Bulk Price Update - Procedure
- Select the desired price list items using the checkbox. To select all items, click the checkbox in the top row of the grid.
- Click the "Change Price" button.
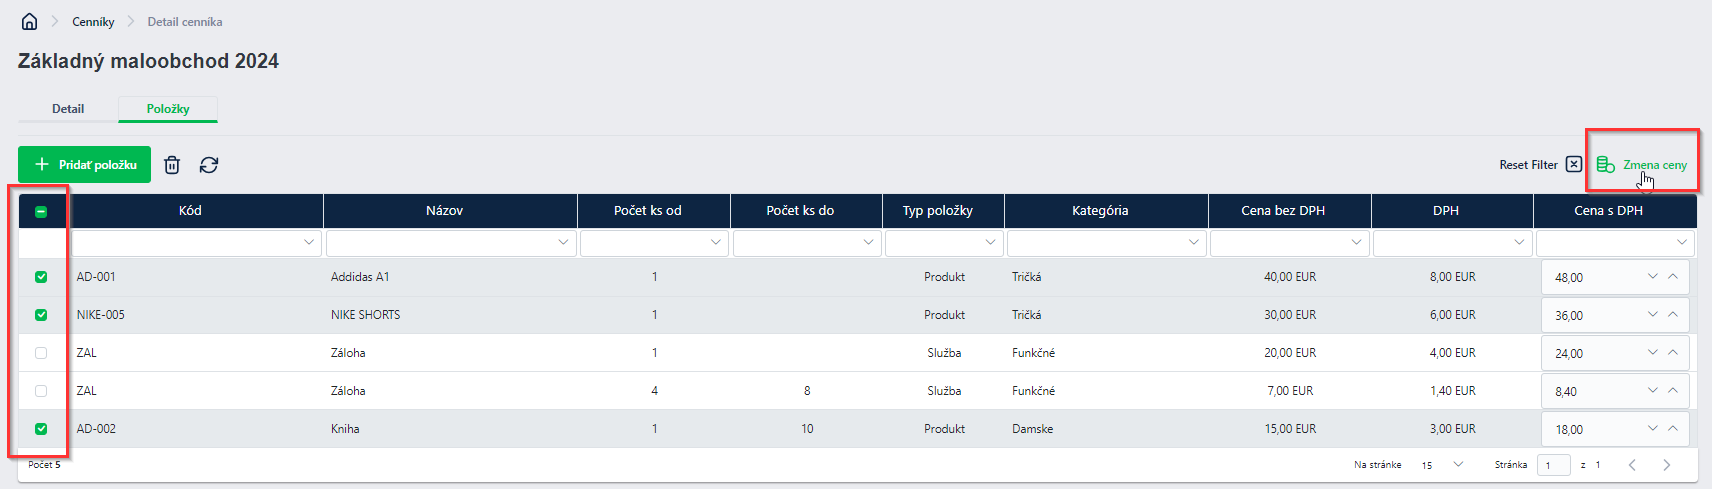
- Choose the method of price change:
- Fixed price setting: Define an exact amount for the selected items.
- Percentage price change: Define a percentage change and specify whether it is an increase or a decrease.

- Confirm the changes, which will automatically be applied to the selected price list items.
¶ Suppliers
The Suppliers module serves as a registry of information about existing suppliers. This information is used for automatic pre-filling when working with purchase orders. Supplier data is organized into two tabs: Detail and Other information.
¶ Suppliers – Detail Tab
The Detail tab for Suppliers consists of the following sections:
¶ Company
After entering the company name, additional information is automatically loaded from the Address Register. You can then edit or add further details. When managing suppliers, the following information is used:
- Company name *: Mandatory company name, serving as the main supplier identifier.
- Company ID: Identification number of the organization.
- VAT ID: Value-added tax identification number.
- Tax ID: Tax identification number.
- Phone number: Supplier’s contact phone number.
- Email: Supplier’s contact email address.
- Price list: If the supplier has a special price list, you can assign them a supplier-specific price list containing fixed prices for selected items. This price list can be created or set as a supplier price list. In the Price List section, check the box for "supplier price list", and then in the Supplier section, select the appropriate price list. After that, you can add products from this supplier.
¶ Billing Address
- Street *: The street where the supplier is located.
- Street number *: Mandatory street number.
- Building number: Optional building number.
- ZIP code *: Mandatory postal code.
- District: Optional field.
- Region: Optional field.
- City *: Mandatory city.
- Country *: Mandatory country.
¶ Contact Person
- First name: Contact person’s first name.
- Last name: Contact person’s last name.
- Phone number: Contact person’s phone number.
- Email: Contact person’s email address.
¶ Suppliers – Other Information Tab
Additional information may include comments, secret passwords, or other notes important for internal company use.
- Description: Any comment or note regarding the supplier.
- Other date: Option to enter a date if it differs from the current date.
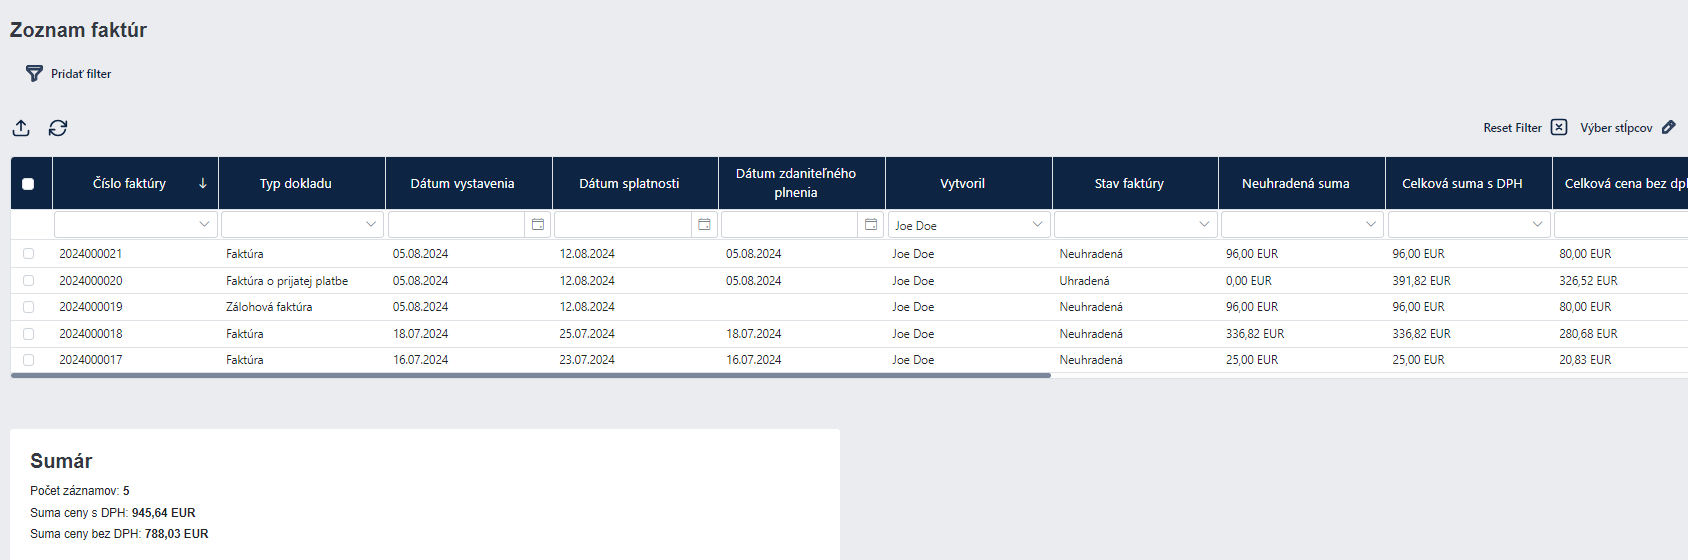
¶ Invoices
The Invoices section provides an overview of all invoices generated from sales or purchase orders. It consists of two parts: Supplier Invoices and Customer Invoices.
¶ Displayed Data
- Invoice number: A unique number assigned to each invoice.
- Document type: The type of document, e.g., invoice, credit note, etc.
- Issue date: The date when the invoice was created.
- Due date: The date by which the invoice must be paid.
- Taxable supply date: The date when the taxable supply took place.
- Created by: The user who created the invoice.
¶ Functionalities
- Non-editable: Invoices in this section are available for viewing only, not editing.
- Filtering and sorting: Advanced filtering and sorting options by various parameters are available to help you quickly find a specific invoice or group of invoices. For more details, see the section General Application Functionalities.
- Summary: Below the list of invoices, a summary is displayed that includes:
- Number of records: The total number of invoices in the list.
- Total amount with VAT: The sum of all invoices including VAT.
- Total amount without VAT: The sum of all invoices excluding VAT.

¶ Clients
In the Clients section, you can manage data about your customers, who can be either individuals or companies. The client type can be selected using the button at the top of the section.
¶ Detail
The Detail section in Clients contains information about customers, whether individuals or legal entities. It records the following data:
¶ Personal Data (For Individuals)
- First name *: Mandatory client first name.
- Last name *: Mandatory client last name.
- Phone number *: Mandatory phone number.
- Email *: Mandatory email address.
- Date of birth: Optional field for date of birth.
- Communication language: The language in which the client prefers to communicate.
- ID card number: Client’s ID card number, if required.
- Customer card: Information about the customer card, if the client has one.
¶ Billing Address
- Street *: Client’s street address or company headquarters.
- Street number *: Mandatory street number.
- Building number: Optional building number.
- ZIP code *: Mandatory postal code.
- District: Optional field for district.
- Region: Optional field for region.
- City *: Mandatory city.
- Country *: Mandatory country.
¶ Company Data (For Legal Entities)
- Company name *: Mandatory company name.
- Company ID *: Identification number of the company.
- Tax ID: Tax identification number.
- VAT ID: VAT identification number, if applicable.
- Phone number: Company contact phone number.
- Email: Company contact email address.
¶ Person (Adding a Contact Person to a Company)
For each company, it is possible to add a contact person with the same data fields as for an individual client.
¶ Billing Address and Company Headquarters
- Billing address: Linked with the address register for quick lookup and pre-filling. If the address is not in the register (e.g., a foreign address), it can be entered manually.
- Company headquarters: The address of the company’s headquarters, which may differ from the billing address.
¶ Other Data
- Description: Any comment or note regarding the client, useful for internal company needs.
- Other date: Option to specify a different date if not using the current date.
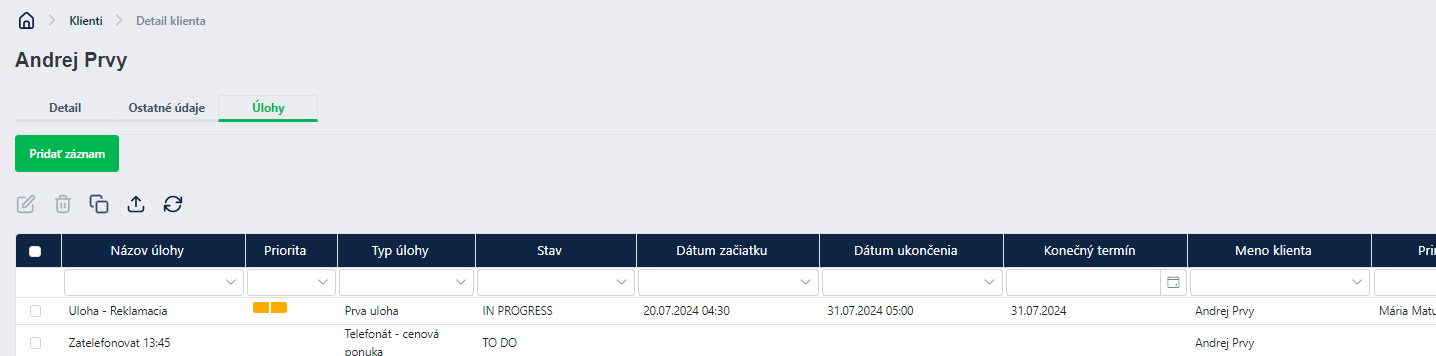
¶ Tasks
For each client, it is possible to create planned tasks, such as sending an email, attending a meeting, or making a phone call. Once created, these tasks will be visible and manageable in the Tasks section.
To create a task, task types must first be defined in the Task Types registry.
¶ Purchase Orders
The Purchase Orders section is used for managing and recording orders from suppliers.
¶ Creating a Purchase Order
When creating a new purchase order, the following information must be filled in:
- Order type *: Mandatory field, which must be predefined in the Purchase Order Types registry.
- Existing supplier: Select an existing supplier from the list previously defined in the Suppliers section.
¶ Order Detail
After creating a purchase order, detailed information is displayed and can be edited:
- Assigned to *: The person responsible for checking and managing the current order status.
- Delivery date: Expected delivery date of the goods.
- Order date: The date when the order was created.
- Branch: The branch where the goods will be delivered. Must be predefined in the Branches registry.
- Supplier: The supplier must first be created in the Suppliers section.
- Warehouse: The warehouse where the goods will be stored. Must be predefined in the Warehouses registry.
¶ Contact Person
Enter information about the supplier’s contact person:
- First name: Contact person’s first name.
- Last name: Contact person’s last name.
- Phone number: Contact person’s phone number.
- Email: Contact person’s email address.
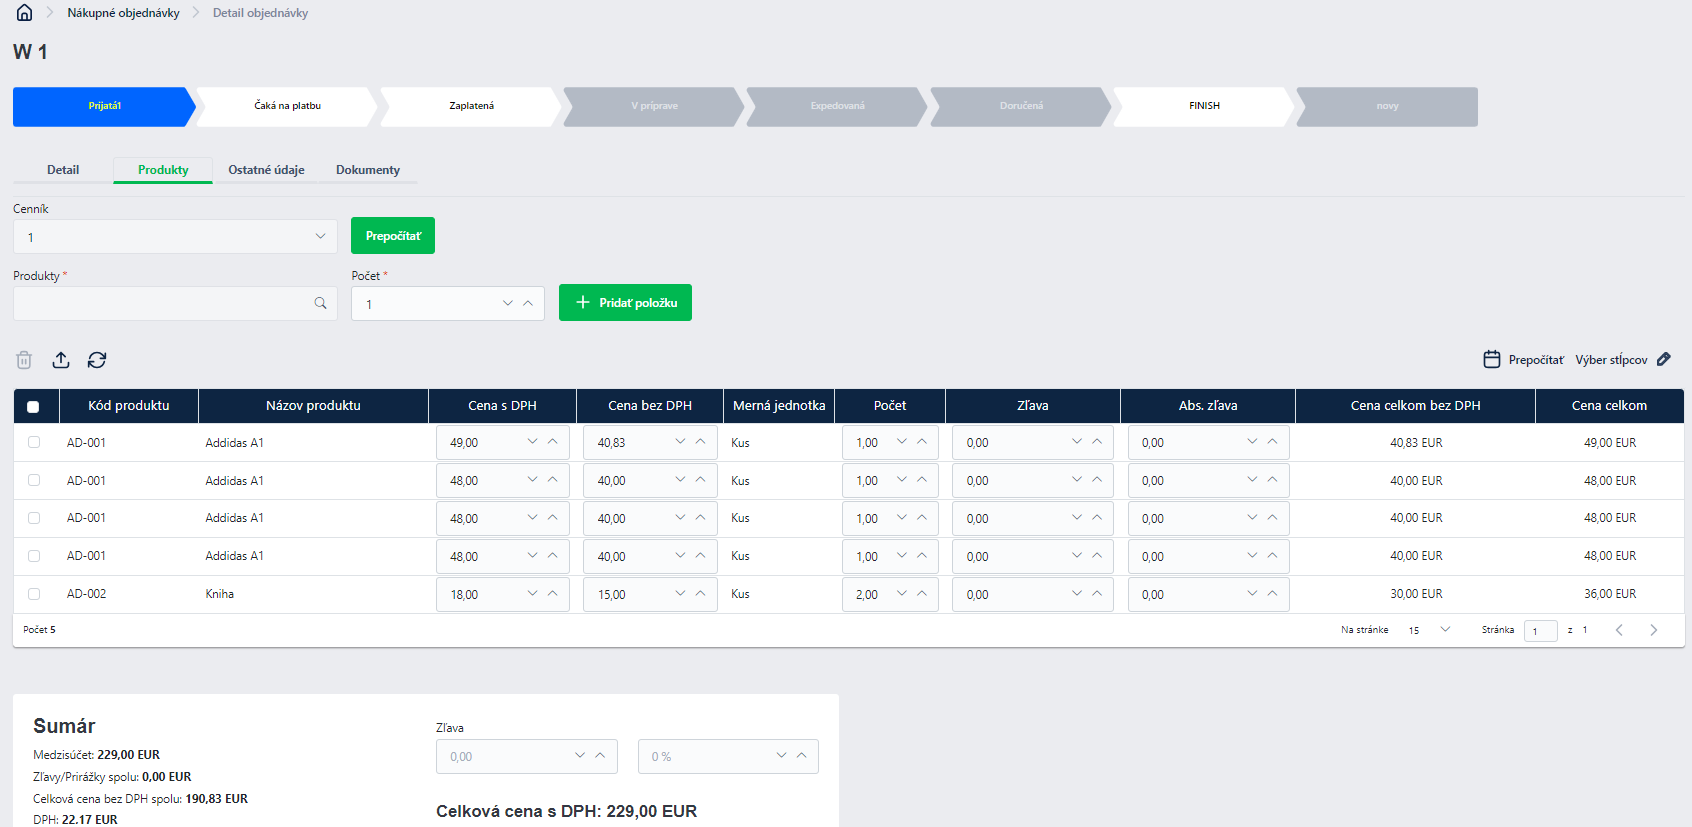
¶ Products
Adding products to a purchase order includes the following steps:
- Price list: The user selects a supplier price list from the dropdown menu. After selecting the price list and clicking Recalculate, product prices in the order are automatically updated according to the chosen price list.
- Products *: Full-text search allows quick search and addition of products to the order.
- Quantity *: Number of ordered units of each product.
- Summary: Below the product table, a summary is displayed with the following information:
- Subtotal: Total price without discounts and VAT.
- Discounts/Surcharges total: Sum of all discounts or surcharges.
- Total price excl. VAT: Total price of all items in the order excluding VAT.
- Discount: Total discount applied to the order.
- Total price incl. VAT: Total price including VAT.
¶ Other Information
This section allows entering additional relevant data:
- Description: Any comment or note related to the purchase order, useful for internal company needs.
- Other date: Option to specify a date other than the current date.
¶ Documents
The Documents section allows uploading and attaching files (such as contracts, offers, and other documents) to the purchase order. Supported formats include Word, PDF, and others.
¶ Workflow
Workflow displays the sequence of steps and statuses through which a purchase order passes. This sequence is shown at the top of the window and allows:
- Status change: By clicking the current status in the top panel, you can move to the next step in the order process.
- Assigning actions: When changing the workflow (WFL) status, you can assign actions such as adding a comment, assigning a user (e.g., an accountant to verify payment), or other tasks. You can also add an accounting document number, comments, or check mandatory data such as billing addresses.
¶ Sales Orders
The Sales Orders section is used for managing and recording customer orders.
¶ Creating a Sales Order
When creating a new sales order, the following information must be filled in:
- Order type *: Mandatory field, which must be predefined in the Sales Order Types registry.
- Existing customer: Select an existing customer from the list previously defined in the Clients section.
¶ Order Detail
After creating a sales order, detailed information is displayed and can be edited:
- Assigned to *: The person responsible for checking and managing the current order status.
- Delivery date: Expected delivery date of the goods.
- Branch: The branch handling the sales order. Must be predefined in the Branches registry.
- Warehouse: The warehouse where the goods will be stored. Must be predefined in the Warehouses registry.
¶ Contact Person
Enter information about the customer’s contact person:
- First name: Contact person’s first name.
- Last name: Contact person’s last name.
- Phone number: Contact person’s phone number.
- Email: Contact person’s email address.
¶ Billing Information
If the client is a company, billing data consists of company details; if the client is an individual, billing data consists of personal details (see the Clients section above).
If the billing details are the same as the contact person’s details, selecting the checkbox will automatically prefill the corresponding fields.
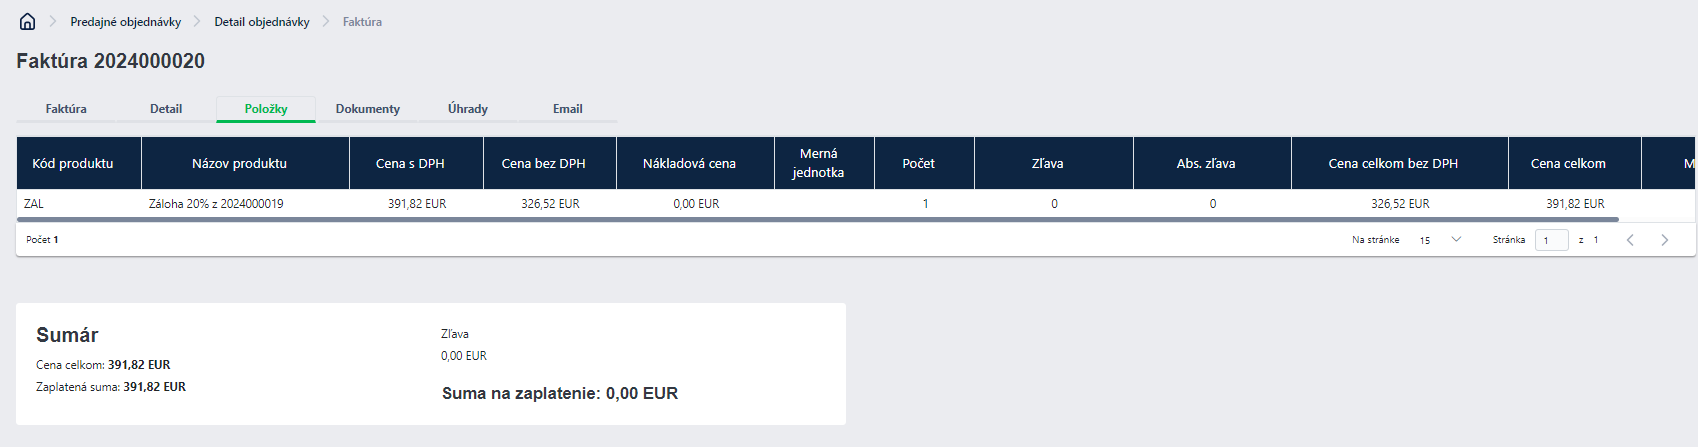
¶ Products
Adding products to a sales order includes the following steps:
- Price list: The user selects a price list from the dropdown menu. After selecting the price list and clicking Recalculate, product prices in the order are automatically updated according to the chosen price list.
- Products *: Full-text search allows quick search and addition of products to the order.
- Quantity *: Number of ordered units of each product.
- Summary: Below the product table, a summary is displayed with the following information:
- Subtotal: Total price without discounts and VAT.
- Discounts/Surcharges total: Sum of all discounts or surcharges.
- Total price excl. VAT: Total price of all items in the order excluding VAT.
- Discount: Total discount applied to the order.
- Total price incl. VAT: Total price including VAT.
¶ Other Information
This section allows entering additional relevant data:
- Description: Any comment or note related to the sales order, useful for internal company needs.
- Other date: Option to specify a date other than the current date.
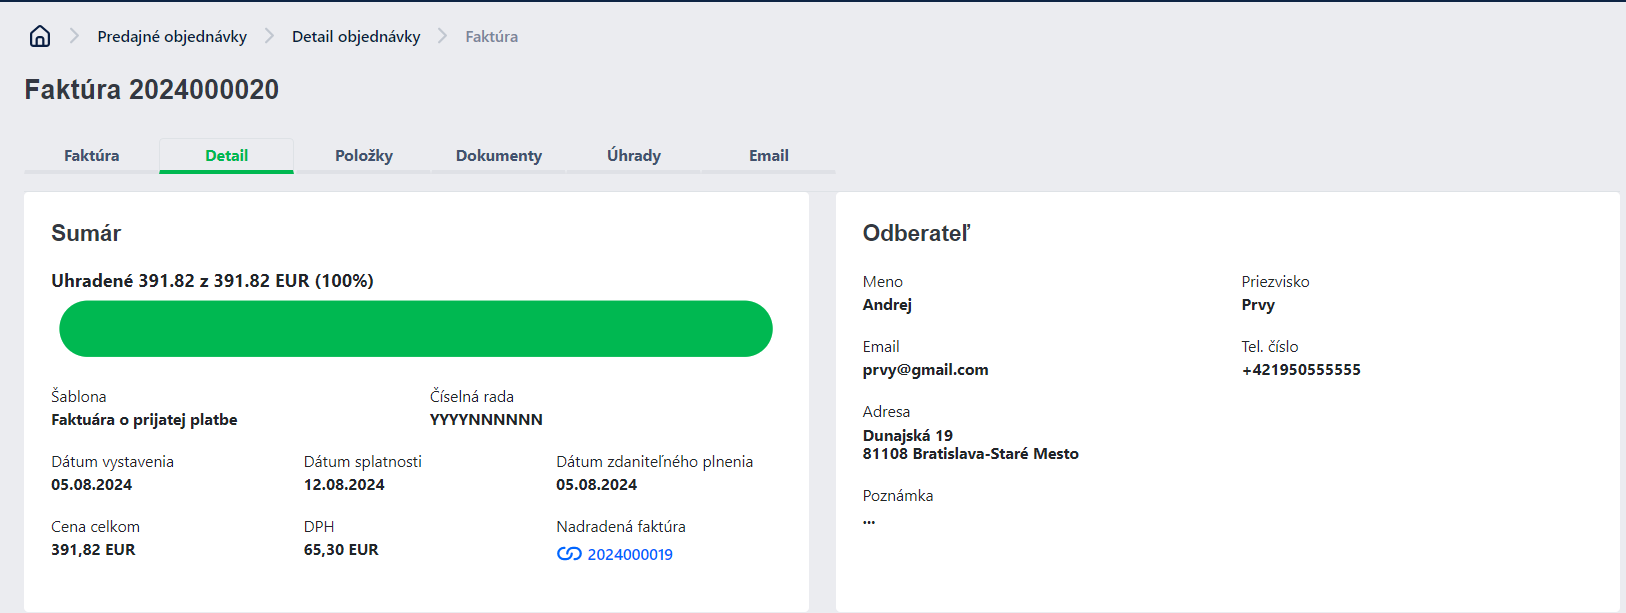
¶ Invoices
The Invoices section provides an overview of invoices linked to the sales order.
The Invoice action in the upper-right corner of the window allows recording an invoice, proforma invoice, or received payment.
It is possible to invoice all items or only selected (checked) items from the list.
When recording an invoice, a dialog appears where the following data must be defined:
- Template *: Selected from the Templates registry. If only one exists, it is prefilled automatically.
- Numbering series *: Selected from the Numbering Series registry. If only one exists, it is prefilled automatically.
- Issue date *: Prefilled with the current date.
- Taxable supply date *: Prefilled with the current date.
- Due date *: Prefilled with the current date plus the defined number of days.
- Note: Optional note related to the invoice.
- Payment method *: Selected from the Payment Methods registry.
- Already paid: If checked, the payment date is prefilled with the current date.
- Send by email: If checked, the invoice is sent by email.
- Email template: Selected from the Email Templates registry.
- Recipient: Recipient email address.
When recording a Proforma Invoice, a dialog appears where the following data must be defined:
- Template *: Selected from the Templates registry.
- Numbering series *: Selected from the Numbering Series registry.
- Issue date *: Prefilled with the current date.
- Due date *: Prefilled with the current date plus the defined number of days.
- Note: Optional note related to the invoice.
- Send by email: If checked, the invoice is sent by email.
- Email template: Selected from the Email Templates registry.
- Recipient: Recipient email address.
When recording a Payment Invoice, a dialog appears where the following data must be defined:
- Proforma invoice *: The number of the related proforma invoice.
- Payment percentage [%] *: Percentage of the payment made (default prefilled with 100%).
- Amount incl. VAT *: The invoiced amount including VAT, based on which the final amount with VAT is recorded.
All recorded invoices are displayed in the Invoices overview.
¶ Tasks
In the Tasks section, planned tasks related to the order and invoicing process can be created, such as sending an email, attending a meeting, or making a phone call. Once created, these tasks are visible and manageable in the Tasks section.
To create a task, task types must be predefined in the Task Types registry.
¶ Workflow
Workflow displays the sequence of steps and statuses through which a sales order passes. This sequence is shown at the top of the window and allows:
- Status change: By clicking the current status in the top panel, you can move to the next step in the order process.
- Assigning actions: When changing the workflow (WFL) status, you can assign actions such as adding a comment, assigning a user (e.g., an accountant to verify payment), or other tasks. You can also add an accounting document number, comments, or check mandatory data such as billing addresses.
¶ Products
The Products section is used to manage individual products and services offered by the company. This part contains all necessary information for creating and editing products, including their categorization, unit of measure, tax rate, and other specifics.
¶ Basic Information
- Product or Service: Checkbox to indicate whether the entry is a product or a service.
- Code *: Mandatory unique identifier of the product or service.
- Name *: Mandatory name of the product or service.
- Unit of Measure *: Mandatory unit of measure, e.g., pieces, kilograms, liters, etc.
- VAT Rate *: Mandatory VAT rate for the given product or service.
- Manufacturer: Name of the product manufacturer.
- Tags: Option to add tags to simplify product search and categorization.
- Legal complaint period from purchase [months]: Number of months during which the product can be claimed under warranty.
- Description: Detailed description of the product or service, which may include technical specifications, usage, and other relevant information.
- Link to external information system: Option to connect the product with external systems such as SPIN or Qasida.

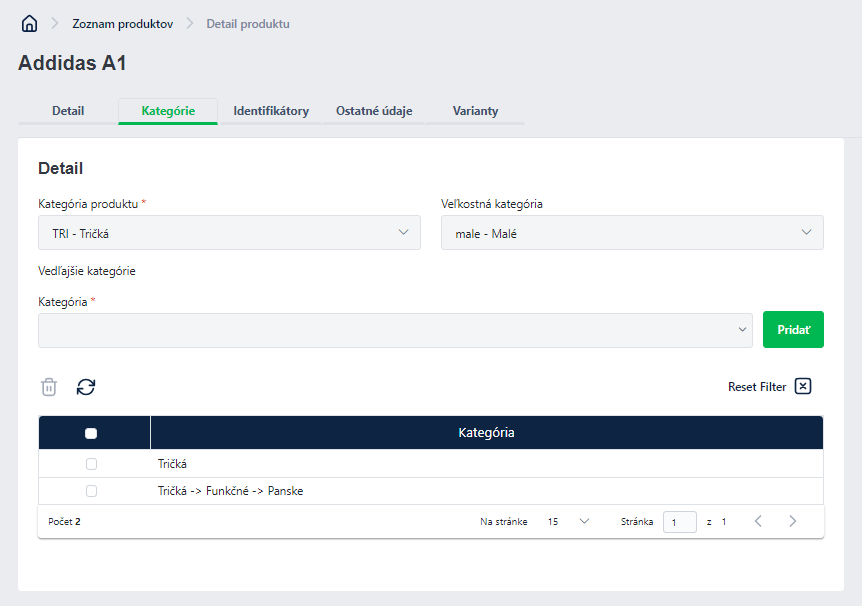
¶ Categorization
To properly assign the product into categories and improve search, the following data must be filled in:
- Product Category *: Mandatory classification of the product into a category defined in the Product Categories registry.
- Size Category: Definition of the product’s size category, if relevant.
¶ Identifiers
- Identifiers: Free-text identifiers (tags) that simplify product search and organization.
¶ Other Information
This section allows you to add additional information important for internal company needs:
- Description: Any comment or note related to the product, which may be useful for internal processes or marketing purposes.
- Other date: Option to specify a date other than the current one.
¶ Product Variants
- Variants: Option to add product variants from the Product Variants registry. Variants may include different versions of the product based on color, size, material, or other characteristics.
¶ Projects
The Projects section is designed for financial project management – costs and revenues over a timeline. Thanks to this functionality, the Order Manager application connects all your key records.
¶ Basic Information
When creating a new project, the following mandatory data must be filled in:
- Project Type *: Mandatory selection of the project type from the registry.
- Project Name *: Mandatory name clearly identifying the project.
- Client Name: The client for whom the project is intended (if relevant).
- Price List
- Supplier Price List
- Start Date: Date when the project begins.
- End Date: Date when the project is expected to end.
- Assigned to *: The person responsible for carrying out the project.
- Owner *: The person who owns the project (responsible for the overall process).
- Costs / Revenues *: Definition of task priority (e.g., low, medium, high).
¶ Description
The Description tab is used to record more detailed information about the project.
¶ Timeline
¶ Linked Records
Project linking with other records in the system (e.g., invoices, orders).
¶ Reports
The Reports tab displays a list of reported costs (tasks, orders, etc.) included in the given project.
¶ Other Information
The Other Information tab is a space for recording additional optional project parameters.
¶ Documents
The Documents tab is used to record files related to the project.
¶ Complaints
The Complaints section is used to manage complaints about products and services. It contains all the important information required for handling complaints, including product details, customer information, and the specifics of the complaint itself.
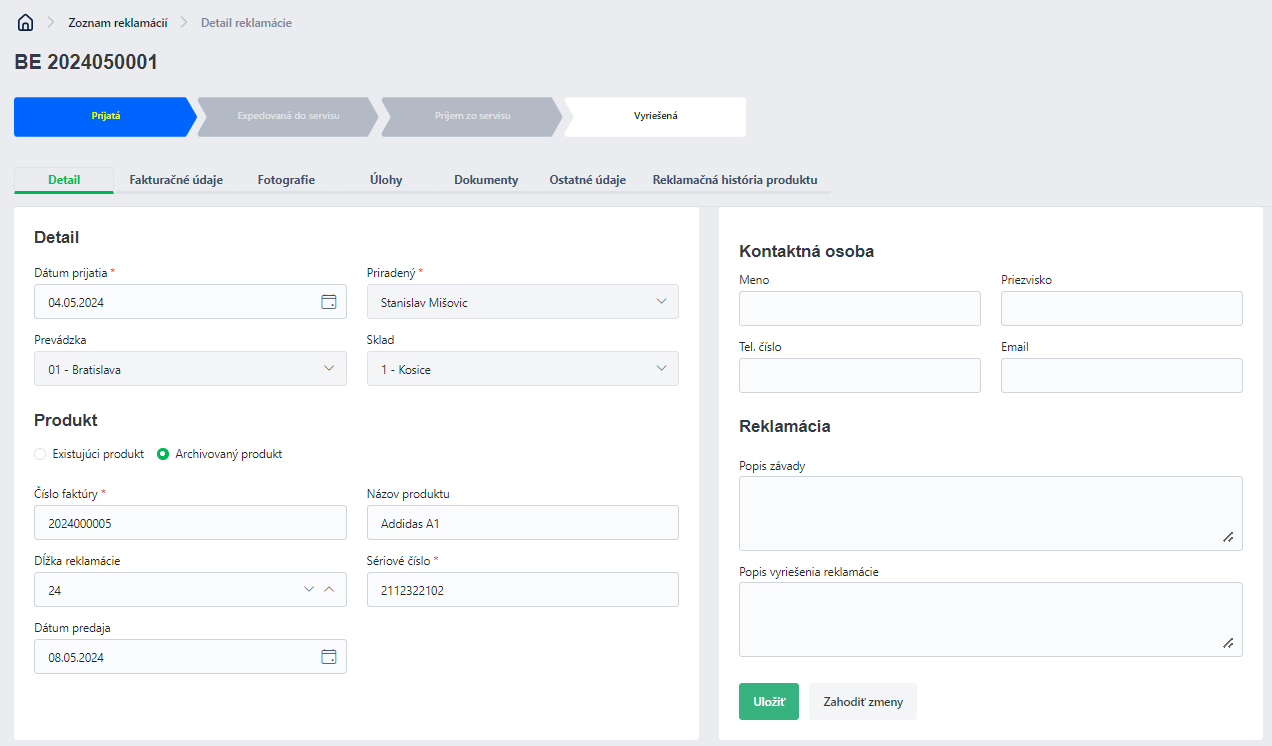
¶ Registering a Complaint
When creating a new complaint, the following mandatory fields must be filled in:
- Complaint Type *: Mandatory field defining the type of complaint.
- Order: Reference to the order from which the claimed product originates.
- Product: Selection of the product to which the complaint applies.
¶ Details
This tab contains detailed information about the complaint:
- Date Received *: Mandatory date when the complaint was received.
- Assigned to *: The person responsible for resolving the complaint.
- Branch: The branch where the complaint was received.
- Warehouse: The warehouse where the product is stored.
¶ Product Information
Information about the claimed product:
- Existing Product or Archived Product: Indicates whether the product is current or archived.
- Invoice Number *: Mandatory invoice number for the purchased product.
- Product Name: Name of the claimed product.
- Warranty Period: Number of days/months during which the product can be claimed.
- Serial Number *: Mandatory serial number of the claimed product.
- Date of Sale: Date when the product was sold.
¶ Contact Person
Details about the person submitting the complaint:
- First Name: First name of the contact person.
- Last Name: Last name of the contact person.
- Phone Number: Phone number of the contact person.
- Email: Email address of the contact person.
¶ Complaint
- Fault Description: Detailed description of the defect that is the subject of the complaint.
- Resolution Description: Description of the solution that was carried out to resolve the complaint.
¶ Billing Information
Billing details depend on the type of client:
- Company Information: Used if the client is a company.
- Personal Information: Used if the client is an individual.
If the billing information is identical to the contact person, it can be automatically filled in by checking the appropriate checkbox.
¶ Photos
- Photo documenting the defect: Option to upload a photo that documents the defect on the product.
¶ Tasks
As in the Purchase Orders and Sales Orders sections, you can create and manage tasks related to the complaint.
¶ Documents
Here you can add and manage any files related to the complaint:
- Documents: Option to upload files such as contracts, offers, or any other relevant documents in formats like Word, PDF, etc.
¶ Other Information
In this section, you can add additional information that may be important for the company’s internal needs:
- Description: Any comment or note regarding the complaint, which may be useful for internal processes or marketing purposes.
- Other Date: Option to specify a date other than the current one.
¶ Product Complaint History
This section contains a table with historical complaint records for the given product:
- Complaint Number: Unique number assigned to each complaint.
- Date Received: Date when the complaint was received.
- Date Resolved: Date when the complaint was resolved.
- Complaint Type: Type of complaint.
¶ Tasks
The Tasks section allows for the management of individual tasks associated with various clients, projects, or internal processes. It provides detailed tracking of tasks, including information on time, costs, and outcomes.
¶ Basic Information
When creating a new task, the following mandatory information must be provided:
- Task Type *: Required selection of the task type from the list in the register.
- Task Name *: A mandatory name that clearly identifies the task.
- Client Name: The name of the client for whom the task is intended (if relevant).
- Start Date *: The mandatory date when the task begins.
- End Date *: The mandatory date when the task is expected to be completed.
- Priority *: Setting the task's priority (e.g., low, medium, high).
- Deadline *: The mandatory deadline by which the task must be completed.
- Linked Records: Linking the task with other records in the system (e.g., invoices, orders).
- Internal/External: Selection from a combobox whether the task is internal or external.
- Assigned *: The person responsible for executing the task.
- Owner *: The person who owns the task (responsible for its overall progress).
- Predefined Service: Choose a predefined service related to the task (if relevant).
- Planned Effort: The estimated time required to complete the task.
- Time Unit (minutes/hours): The unit of measure for the planned effort.
- Hourly Sales Rate: The rate at which the time spent on the task is billed to the client.
- Hourly Cost Rate: The internal cost rate associated with the task.
- Task Description: A detailed description of what the task involves.
- Outcome Description: A description of the outcome after the task is completed.
¶ Documents
In this section, you can attach any relevant files to the task:
- Documents: Option to upload files such as contracts, offers, technical documentation, etc.
¶ Time Sheets
Time Sheets record the time spent on the task and the associated costs:
- Add Time Sheet: Add a new time sheet by clicking the "Add Time Sheet" button. Each time sheet includes the following data:
- Start Date *: The date and time the reported activity began.
- Duration *: The total duration of the activity.
- Time Unit (minutes/hours) *: The unit of measure for the duration.
- Hourly Sales Rate: The rate at which the time spent on the task is billed to the client.
- Total Cost *: The total cost of the performed activity.
- Assigned *: The person who carried out the activity.
- Paid: Indication of whether the work has been paid for.
- Note: Any note related to the time sheet.
¶ Workflow
Tasks are part of the workflow defined in the Workflow register. This process determines the steps through which the task progresses from assignment to completion:
- Change Status: At the top of the task window, you can click the status to move the task to the next step. Status changes are governed by the workflow rules defined for the specific task type.
¶ Product Returns
The Product Returns section allows for the management and tracking of returned products. This functionality is useful for processing returns from clients and ensures the entire process is tracked from receipt to completion.
¶ Recording a Product Return
When creating a product return record, the following mandatory information must be provided:
- Return Type *: Mandatory selection of the product return type.
- Order: Linking the return to an existing order (if relevant).
- Invoice *: Mandatory selection of the related invoice for the return.
- Return Entire Order: Checkbox to indicate whether the entire order is being returned.
¶ Details
Detailed information about the return:
- Date of Receipt *: The mandatory date when the product was received for return.
- Restocking Date: The date when the product was restocked after return.
- Responsible *: The person responsible for processing the return.
- Shipping Method: Information on how the product was returned.
- Department: The branch where the return was processed.
- Warehouse: The warehouse to which the product was returned.
¶ Contact Person
Details of the person who is the contact for the return:
- First Name: The first name of the contact person.
- Last Name: The last name of the contact person.
- Phone Number: The phone number of the contact person.
- Email: The email address of the contact person.
¶ Additional Information
This section allows for the addition of supplementary information:
- Reason for Return: Specification of the reason why the product was returned.
- Description: Any comment or note regarding the return.
¶ Billing Information
Billing information is adapted to the client type (corporate or personal information). If the billing information matches the contact person, it can be automatically prefilled by checking the appropriate checkbox.
¶ Products
Section to add the products that were returned:
- Add Returned Product: Option to add the returned products with the relevant details.
¶ Other Information
Option to add additional information:
- Description: Any comment or note regarding the product return, useful for internal processes or marketing purposes.
- Other Date: If a different date needs to be entered other than the current one, it can be specified here.
¶ Invoices
A list of invoices related to the product return.
¶ Tasks
Just like with orders and complaints, tasks related to the product return are displayed in this section and can be managed.
¶ Workflow
The return process is governed by the workflow, similar to other modules. At the top of the window, you can click the return status to move it to the next step.
¶ Requests
The Requests section is used to manage internal or external requests for products or services. It allows recording all necessary information and tracking the process from request creation to fulfillment.
¶ Basic Information
When creating a request, the following mandatory fields must be filled in:
- Request Type *: Mandatory selection of the request type from the list in the catalog.
- Requester *: Person submitting the request.
- Assigned to: Person responsible for processing the request.
- Branch: Branch where the request is processed.
- Warehouse: Warehouse from which the request should be fulfilled.
- Expected Delivery Date: Date when the requested items are expected to be delivered.
- Estimated Amount Excluding VAT: Estimated price of the requested items excluding VAT.
- Supplier: Supplier who is to deliver the items.
- Description: Any description or note related to the request.
¶ Items
Section for adding items to the request:
a) Existing Item: Option to add an item from the list of existing items by selecting based on: Price List, Product *, Quantity *.
b) Non-Existing Item: If the item does not exist in the system, it can be created. Mandatory fields are:
- Name *: Mandatory name of the product or service.
- Unit of Measure *: Mandatory unit of measure, e.g., pieces, kilograms, liters, etc.
- VAT Rate *: Mandatory VAT rate for the product or service.
- Unit Price Excluding VAT *: Price of the product excluding VAT.
- Currency *: Specifies the currency in which prices in the price list are listed, e.g., EUR, CZK, or USD.
- Quantity *: Quantity of the item.
- Description: Optional text.
¶ Other Information
Option to add additional details:
- Description: Any comment or note regarding the request, which may be useful for internal processes or marketing purposes.
- Other Date: If a date other than the current date needs to be specified, it can be entered here.
¶ Documents
Section for uploading files relevant to the request, such as contracts, offers, technical specifications, and other documents.
¶ Workflow
The request processing is managed by a workflow. At the top of the window, clicking on the request status allows moving it to the next step in the workflow.