¶ Asseco QASIDA Rental
The primary task of the application QASIDA Rental is the management of reservations of defined resources, or sets of resources, during a time cycle that can be set.
The application Rental can be connected to products for administration and management of relations with customers, loyalty systems and other products from the portfolio of Asseco Solutions or other third parties.
¶ Supported types of rental companies
- Short-term rentals - Give your customers what they need when they need it, and help them give it back effortlessly when they don't.
- Long-term rentals - Rent equipment for months to help your clients succeed in their longer projects.
- Rent-to-buy - Help your customers test before they have to commit. Your customers appreciate the flexibility, while you can enjoy lower returns and higher profit margins.
- Rent + service - Combine experience and rental sales without the hassle of planning and calculating availability.
¶ Overview of the Asseco Rental application - Main Menu
The Asseco Rental application features a main menu located on the left side of the screen. This menu includes the following items:f
- Dashboard - The Dashboard provides a comprehensive overview of the current status of your reservations, invoices, and other key indicators. It is the main page of the application that gathers all important information in one place for quick access and overview.
- Price Lists - In this section, you can manage price lists for various products and services and set pricing conditions.
- Imports - This section of the system enables the import of master data into the Rental application using an XLS file format.
- Clients - The Clients section is for managing information about your customers and managing your contacts.
- Overviews - The Overviews section provides all essential information about invoices, deposits, products, and reservations in one place.
- Products - Here, you can manage the list of products you offer for reservations, manage their descriptions, categories, prices, and track your inventory.
- Reservations - The Reservations section is a key part of the Rental system. In this section, you can manage all aspects of the reservation process.
- Sets - The Rental application supports the renting of entire sets. Here, you can manage your sets and associated price categories.
- Settings - To effectively use the Rental application, it is essential for a user with the Administrator role to ensure the necessary basic settings and define registries.
¶ Application Control
¶ Functions over Records
- Adding, editing, deleting, cloning a record
- Filtering, sorting records
- Exporting the list
¶ Custom filter
In individual records, as well as in Dashboard widgets, a flexible custom filter functionality is implemented.
The workflows for using custom filters are as follows:
¶ Creating a Custom Filter
The process for creating a custom filter is as follows:
Click the `Add Filter` button.
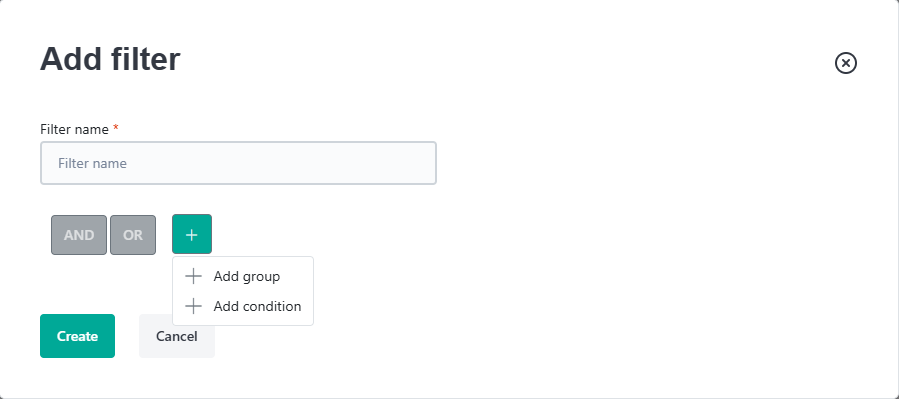
A window for defining a custom filter will open.
Steps to define a filter:
1. Enter the filter name.
2. Click `+` and choose whether to `Add condition group` or `Add condition`.
3. Select a field.
4. Select an `operation` (`greater than`, `greater than or equal to`, `less than`, `less than or equal to`, `equals`, `does not equal`).
5. Enter the value to evaluate the condition against.
6. Within the group, choose an operator (AND / OR).
7. Repeat as needed. By adding more conditions or groups, you can build rules and groups in a hierarchical structure.
8. Click **Create** to save the filter. Saved filters will appear at the top of the window next to the filter definition button.
The Add Filter button is located at the top of the screen above the list.
Filter definition form:
¶ Activating and Editing a Custom Filter
A filter is activated or deactivated by clicking its name. An active filter is indicated in green; a deactivated filter is grey. Saved filters can be edited, duplicated, or deleted.
To quickly clear all active filters, you can use the Reset Filter button.
For quick and efficient creation of similar filters, you can use the Duplicate Filter option.
¶ Sorting Records in a Table
Clicking on a selected column in the table header allows you to sort the data in ascending or descending order (by clicking repeatedly).
¶ Common Properties of Records
- Mandatory fields are marked with an asterisk (*). In most registers, the basic mandatory fields are Code* and Name*. When creating a new record, the form usually contains only mandatory fields. Optional fields are then added in the detail when editing the record.
- Enabled (true/false) - For each record, there is a checkbox Enabled that determines whether the record is allowed and available for use in the system.
- Comments on record - In each record, Comments are an optional field. Comments can be used for communication, additional notes, or remarks related to the given record.
¶ Settings - Code Lists
The Settings section is used to define code lists and basic system settings. These settings are available to users with the Administrator role.
¶ Numbering Sequences
Numbering sequences are used to automatically generate unique identifiers for various types of documents. When creating or editing a sequence, the following fields are managed:
- Code *: Unique identifier of the numbering sequence.
- Name *: Descriptive name of the numbering sequence.
- Numbering Sequence Type *: Defines the format of the 10-digit numbering sequence. For example:
- YYYYMMNNNN – YYYY represents the calendar year, MM the month, and NNNN is an incrementing number starting from 0001.
- YYYYNNNNNN – YYYY represents the calendar year, and NNNNNN is a 6-digit incrementing number.
- NNNNNNNNNN – All 10 digits represent an incrementing number.
- YYPPNNNNNN – YY is the last two digits of the calendar year, PP is the period (e.g. quarter), and NNNNNN is an incrementing number.
- Valid From *: Date from which the numbering sequence is valid.
- Valid To: Date until which the numbering sequence is valid (optional).
- Record Type: Specifies which type of documents the numbering sequence will be used for (e.g. invoices, orders, reservations, deposits, credit notes, contracts, handover protocols).
¶ External Systems
This section allows you to add and manage data about external systems connected to the QASIDA Rental application (e.g. QASIDA API). When creating or editing, the following fields are managed:
- Code *: Unique identifier of the external system.
- Name *: Name of the external system.
- Key *: Generated secret key used to connect with the external system. The key is automatically generated by the QASIDA Rental application.
- Created: Date when the connection and secret key were created.
¶ VAT Level
The VAT Levels Directory is used as an attribute in a product. The following steps will help you manage all necessary operations.
¶ Creating a New VAT Level
- Click on the
Add Recordbutton or a similarly labeled button. - In the new form, fill out the following required fields:
- Code (up to 10 characters)
- Name (up to 50 characters)
- Value (up to 10 digits, 2 decimal places)
- Country
- Set the
Enabledflag as True or False as needed. - Click the
Savebutton or a similarly labeled button.
¶ Updating an Existing VAT Level
- In the list of VAT levels, click the
Editbutton or a similarly labeled button next to the level you wish to update. - Make the necessary changes in the available fields, just like when creating a new VAT level.
- Click the
Savebutton or a similarly labeled button.
¶ Deleting an Existing VAT Level
- In the list of VAT levels, click the
Deletebutton or a similarly labeled button next to the level you wish to delete. - Confirm your decision in the dialog box that appears.
Mastering these steps will allow you to fully work with the VAT Levels Directory.
¶ Price Categories
This code list is used to define price list categories. The following steps will guide you through all the necessary operations.
¶ Creating a New Price List Category
- Click the Add Record button.
- In the new form, fill in the following required fields:
- Code (maximum 10 characters)
- Name (maximum 100 characters)
- Description (optional)
- Click Save or the similarly labeled button.
- Set the Enabled flag to True or False, depending on your needs.
- On the "Assigned products" tab, you can manage the products assigned to the selected price list category.
¶ Updating an Existing Price List Category
- In the list of product categories, click the Edit button or the similarly labeled button next to the category you want to update.
- Make the necessary changes to the available fields or the list of products within the price list category.
- Click Save or the similarly labeled button.
¶ Deleting an Existing Price List Category
- In the list of price list categories, click the Delete button or the similarly labeled button next to the category you want to delete.
- Confirm your decision in the dialog box.
Following these steps will enable you to fully manage the Price List Categories code list.
¶ Product Categories
Product Categories is a unified directory for categorizing products. The following steps will help you manage all necessary operations.
¶ Creating a New Product Category
- Click the
Add recordbutton or similarly labeled button. - In the new form, fill out the following required fields:
- Code (up to 10 characters)
- Name (up to 100 characters)
- Set the
Enabledflag as True or False as needed. - Click the
Savebutton or similarly labeled button.
¶ Updating an Existing Product Category
- In the list of product categories, click the
Editbutton or similarly labeled button next to the category you wish to update. - Make the necessary changes in the available fields, just as when creating a new category.
- Click the
Savebutton or similarly labeled button.
¶ Deleting an Existing Product Category
- In the list of product categories, click the
Deletebutton or similarly labeled button next to the category you wish to delete. - Confirm your decision in the dialog box.
Mastering these steps will allow you to fully work with the Product Categories Directory.
¶ Payment Methods
In the Payment Methods section, you can define various ways customers can pay for their orders. Fill in the following fields:
- Code *: Unique code for the payment method.
- Name *: Name of the payment method (e.g., cash, credit card, PayPal).
¶ Users
The Users are unique individuals who have access to the application. The following steps will assist you in managing all the necessary operations.
¶ Creating a New User
- Click on the
Add Recordbutton. - In the new form, fill out the following required fields:
- First name
- Last name
- Username - this must always be an email
- Role - options to choose from: administrator, user
- Language - language for the application, options to choose from: Slovak, Czech, English
- Click on the
Savebutton. After saving, the user detail will be displayed, through which you can complete the remaining data, specifically:- Operation - selection from the operation directory
- Team - selection from the team directory
¶ Updating an Existing User
- In the list of users, click on the
Editbutton next to the user you want to update. - Make the necessary changes in the available fields, just as when creating a new user.
- Click on the
Savebutton.
By mastering these steps, you will be able to fully work with the User Directory.
¶ User Positions
The User Positions code list is used to manage user job roles within the system.
- Code (required, max. 10 characters)
- Name (required, max. 100 characters)
Each job position entry allows the following operations:
-
Create:
- Click the
Add Recordbutton. - A dialog window will appear where you can enter the item's Code and Name.
- After confirmation, the detail view will open where you can edit the information or add comments related to the job position.
- Click the
-
Update:
- Double-click the record you want to update.
- In the form, you can edit the following fields: Code, Name of the job position, and whether it is Enabled for use in the system.
- Make the necessary changes and confirm.
-
Delete:
- Select the record(s) you want to delete.
- Click the "Delete" icon.
- Confirm deletion in the pop-up dialog box.
¶ Departments
The Departments register is a list of departments that you can manage. The following steps will help you handle all the necessary operations.
¶ Creating a New Department
- Click the
Add recordbutton or similarly labeled button. - In the new form, fill out the following required fields:
- Code (up to 10 characters - only digits)
- Name (up to 100 characters)
- Set the
Allowedflag as needed. - If you wish, you can also enter address information:
- Street
- Building number
- Apartment number
- City
- Postal Code
- Country
- Click the
Savebutton or similarly labeled button.
¶ Updating an Existing Department
- In the list of departments, click the
Editbutton or similarly labeled button next to the Department you wish to update. - Make the necessary changes in the available fields, just as when creating a new Department.
- Click the
Savebutton or similarly labeled button.
¶ Deleting an Existing Department
- In the list of branches, click the
Deletebutton or similarly labeled button next to the department you wish to delete. - Confirm your decision in the dialog box.
Mastering these steps will allow you to work fully with the Departments registry.
¶ Roles
The Roles section allows you to manage different levels of access within the Rental system. Define the following attributes for each role:
- Code *: A unique code representing the role.
- Name *: The name of the role.
- Permissions: For each created role, define specific permissions on the second tab to control access to particular sections of the RENTAL system.
¶ Role Specifications
The RENTAL system includes two default roles:
- Administrator Role: This role is non-editable and has full access to all parts of the system.
- User Role: For this role, you can edit only the permissions for specific sections or code lists. Users with this role do not have access to unauthorized parts of the system, either via URL or the left-hand menu.
Additional roles can be created and edited without restrictions.
¶ Rental Groups
The rental groups directory is used as an attribute in the product. Based on this, products entering the reservation are filtered.
¶ Creating a New Rental Group
- Click on the
Add Recordbutton. - In the new form, fill out the following required fields:
- Code - required - (10 characters)
- Name - required - (100 characters)
- Enabled - T/F
- Click on the
Savebutton.
¶ Updating an Existing Rental Group
- In the list of rental groups, click on the
Editbutton next to the group you want to update. - Make the necessary changes in the available fields, just as when creating a new group.
- Click on the
Savebutton.
¶ Deleting a Rental Group
- In the list of rental groups, click on the
Deletebutton next to the group you want to delete. - Confirm the deletion in the pop-up window that appears.
By mastering these steps, you will be able to fully work with the Rental Groups Directory.
¶ Templates and Email Templates
Templates are essential for creating and managing various documents within the Rental system. These may include invoices, contracts, and other business-related documents.
- Code *: Unique code of the template.
- Name *: Name of the template.
- Template Type *: Specifies the type of template, which can be: Invoice, Credit Note, Contract, Pro Forma Invoice, Payment Receipt Invoice, Other.
- Enabled: Indicates whether the template is active and available for use.
- Comments: Additional information or notes related to the template.
¶ Template – Attachment
- Attach a DOCX file that includes tags for dynamically inserting data into the document at the appropriate places.
- Recommended fonts: Calibri, Cambria, Segoe UI. For marked lists, Verdana may also be used.
¶ Template – Available Tags
When creating templates for automated document and email generation, the following tags are available:
¶ CONTRACT
- ##ContractNumber## – Contract number
- ##ContactPersonName## – Customer’s full name
- ##StreetAndNumberRecipient## – Customer’s street and number
- ##PostCodeRecipient## – Customer’s postal code
- ##CityRecipient## – Customer’s city
- ##ContactPersonIdCard## – ID card number
- ##ContactPersonEmail## – Customer’s email
- ##ContactPersonPhone## – Customer’s phone number
- ##ProductName## – Product name
- ##ProductSerial## – Product serial number
- ##VU|V01## – Kilometers driven
- ##ReservationFrom## – Reservation start date
- ##ReservationTo## – Reservation end date
- ##ProductSumPrice## – Total reservation amount
- ##ProductDepositAmount## – Deposit amount
- ##VU|V02## – Optional info (rented accessories)
- ##ProductImage## – Product damage image
- ##IssueDate## – Contract issue date
¶ INVOICE
- ##InvoiceNumber## – Invoice number
- ##ReservationNumber## – Reservation number
- ##CreatedDate## – Invoice creation date
- ##IssueDate## – Invoice issue date
- ##DeliveryDate## – Delivery date
- ##DueDate## – Payment due date
- ##VariableSymbol## – Invoice variable symbol
- ##DiscountPercentage## – Discount in %
- ##DiscountAmount## – Discount amount with currency
- ##TotalSumPrice## – Total amount with currency
- ##DepositAmount## – Deposit amount with currency
- ##AmountDue## – Amount due
- ##Iban## – IBAN
- ##Bic## – BIC
- ##Notes## – Invoice description
- ##UserName## – Employee name
- ##UserNameEmail## – Employee email
- ##CompanyRecipient## – Customer company
- ##StreetAndNumberRecipient## – Customer’s street and number
- ##PostCodeRecipient## – Customer’s postal code
- ##CityRecipient## – Customer’s city
- ##Cin## – Customer’s company ID
- ##Tin## – Customer’s tax ID
- ##Vatin## – Customer’s VAT ID
- ##ContactPersonName## – Contact person’s name
- ##ContactPersonEmail## – Contact person’s email
- ##ContactPersonPhone## – Contact person’s phone number
¶ Image Tags for Invoices
- ##QR_InvoiceNumber## – QR code with invoice number
- ##QR_ReservationNumber## – QR code with reservation number
- ##Bar_InvoiceNumber## – Barcode with invoice number
- ##PayBySquare## – PayBySquare payment code
¶ Table Tags for Invoices
- ##ProductSummaryTable## – Table summarizing products
- ##VatSummaryTable## – VAT summary table
- ##invoicenumber## – Invoice number
- ##customername## – Customer’s full name
- ##employeename## – Employee’s full name
- ##amount## – Total amount (with currency)
- ##currency## – Invoice currency
- ##iban## – Invoice IBAN
- ##bic## – Invoice BIC
- ##variablesymbol## – Variable symbol / invoice number
¶ Teams
The Team directory is designed to categorize employees into specific groups. The following steps will help you manage all necessary operations.
¶ Creating a New Team
- Click on the
Create New Teambutton or a similarly labeled button. - In the new form, fill out the following required fields:
- Code (up to 10 characters)
- Name (up to 100 characters)
- Set the
Enabledflag as True or False as needed. - Click the
Savebutton or a similarly labeled button.
¶ Updating an Existing Team
- In the list of teams, click the
Editbutton or a similarly labeled button next to the team you wish to update. - Make the necessary changes in the available fields, just like when creating a new team.
- Click the
Savebutton or a similarly labeled button.
¶ Deleting an Existing Team
- In the list of teams, click the
Deletebutton or a similarly labeled button next to the team you wish to delete. - Confirm your decision in the dialog box that appears.
Mastering these steps will allow you to fully work with the Team Directory.
¶ Reservation Types
The Reservation Type directory is used when creating a reservation.
¶ Fields in the Directory
- Code - mandatory (10 characters)
- Name - mandatory (100 characters)
- Color
- Workflow - selection from the workflow directory
- Enabled - True/False
¶ How to Use the Directory
Each directory allows you to:
¶ Create
- Click on the
Add Recordbutton. - A dialog box appears, where you can enter the
Item CodeandItem Name. - After approval, a dialog box appears where you can enter the remaining data.
- Click on `Add Record`.
- Fill in the `Item Code` and `Item Name`.
- Click `Save`.
- A dialog box appears for you to enter the remaining data.
- Fill in `Color`, select the `Workflow`, and set `Enabled` to True or False.
- Click `Save`.
¶ Update
- Click on the item in the directory you wish to update.
- A dialog box appears with all the item details. Update the necessary fields.
- Click on
Save.
- Click on the item you wish to update.
- Update the necessary fields in the dialog box.
- Click `Save`.
¶ Delete
- Click on the
Deletebutton next to the item you wish to remove. - Confirm your choice in the pop-up that appears.
- Click on `Delete` next to the item you wish to remove.
- Confirm your choice in the pop-up.
By following these steps, you can effectively manage the Reservation Types register.
¶ Optional Data
This section allows you to add and manage optional fields that can be assigned to various objects within the system.
- Code *: A unique identifier for the optional field.
- Name *: Name of the optional field, for example, "Additional Insurance" or "Warranty".
- Order *: Specifies the display order of the optional field (default is 99 so that the fields appear at the end and do not interfere with the main structure).
- Placeholder Text: Text displayed as a placeholder when the field is empty.
- Component Type *: Defines the type of UI component used for the field (e.g., text input, dropdown list, etc.). This list of component types is hardcoded.
- Default Value: The default value shown in the field if the user does not specify one.
- Enabled for Records (checkboxes): Allows you to specify which types of records the field is enabled for.
- Required for Records (checkboxes): Allows you to specify which types of records require this field to be filled in.
¶ Performance Categories
The Performance Categories register is used as an attribute in a product. The following steps will help you manage all necessary operations.
¶ Creating a New Performance Category
- Click on the
Add Recordbutton or a similarly labeled button. - In the new form, fill out the following required fields:
- Code (up to 10 characters)
- Name (up to 100 characters)
- Set the
Enabledflag as True or False as needed. - Click the
Savebutton or a similarly labeled button.
¶ Updating an Existing Performance Category
- In the list of performance categories, click the
Editbutton or a similarly labeled button next to the category you wish to update. - Make the necessary changes in the available fields, just like when creating a new category.
- Click the
Savebutton or a similarly labeled button.
¶ Deleting an Existing Performance Category
- In the list of performance categories, click the
Deletebutton or a similarly labeled button next to the category you wish to delete. - Confirm your decision in the dialog box that appears.
Mastering these steps will allow you to fully work with the Performance Categories Directory.
¶ Workflow Roles
The Workflow Roles directory defines possible roles of users who can work with the workflow states.
The detail contains two tabs: Detail and Users.
¶ Detail Tab
This tab contains the following mandatory fields:
- Code - required (10 characters)
- Name - required (100 characters)
- Enabled - True/False
¶ Users Tab
This tab contains the following information about the user:
- First Name
- Last Name
- Username
In the Users tab, there are buttons for:
- Add - this button allows you to add a user from the system.
- Delete - this button allows you to remove a user from the list.
¶ Creating a New Workflow Role
- Click the
Add Recordbutton. - In the dialog that appears, fill out the Code and Name fields.
- Click the
Savebutton. - The new role will appear in the list of roles. Click on it to go to its detail page.
- In the Users tab, click the
Addbutton to add users to this role. A dialog box will appear, from which you can select users from the system.
¶ Updating an Existing Workflow Role
- In the list of roles, click on the role you want to update to go to its detail page.
- Make the necessary changes in the Detail tab.
- In the Users tab, you can add or remove users as needed.
- Click the
Savebutton.
¶ Deleting a Workflow Role
- In the list of roles, click the
Deletebutton next to the role you want to delete. - Confirm the deletion in the displayed pop-up window.
By following these steps, you can manage the Workflow Roles directory, including assigning users to each role.
¶ Workflows
The workflow directory defines possible workflows for reservation types. The detail contains three tabs: Detail, Workflow States, and Reservation Types.
¶ Detail Tab
This tab contains the following required fields:
- Code - required (10 characters)
- Name - required (100 characters)
- Workflow Type - Reservation
- Enabled - True/False
¶ Workflow States Tab
This tab contains a list of states that can be added, copied, and reordered. Each state can be set with:
- State Name
- State Type - TO DO, In Progress, Done
- Active State Color
- Active State Name Color
- Allowed Workflow Roles - selection from the workflow roles directory, it's about which roles can trigger this state
- Allowed States - a list of states that are allowed in the current state
¶ Reservation Types Tab
This tab contains a list of reservation types that this workflow includes.
¶ Creating a New Workflow
- Click on the
Add Recordbutton. - In the dialog that appears, fill in the Code and Name fields.
- Click on the
Savebutton. - The new workflow appears in the workflow list. Click on it and go to the details page.
- In the Workflow States tab, click on the
Addbutton to add states and set their properties. - In the Reservation Types tab, you can add the reservation types that this workflow includes.
¶ Updating an Existing Workflow
- In the list of workflows, click on the workflow you want to update and go to the details page.
- In the Detail tab, make the necessary changes.
- In the Workflow States tab, you can add, edit, or delete states as needed.
- In the Reservation Types tab, you can add or delete reservation types that this workflow includes.
- Click on the
Savebutton.
¶ Deleting a Workflow
- In the list of workflows, click the
Deletebutton next to the workflow you want to delete. - Confirm the deletion in the pop-up that appears.
By following these steps, you can manage the workflow directory.
¶ Dashboard
¶ Main Functionalities in the Dashboard
The Dashboard in the Rental application offers a wide range of features that enable efficient reservation management, real-time monitoring of key performance indicators (KPIs), and quick access to important, always up-to-date information.
Main functionalities available in the Dashboard:
- Search – Full-text search in reservations, allowing you to quickly find the desired data.
- Create – The Create button allows you to instantly create a new reservation.
- KPI Widgets and Charts – Overview of key metrics and statistics visualized in charts and performance indicators.
- Onboarding Steps – A guided setup assistant that helps new users get acquainted with the system's features.
- Q&A Smart Chatbot – An intelligent chatbot that answers your questions and provides direct links to system documentation.
¶ Search Bar
At the top of the Dashboard, there is a search panel. Full-text search allows you to search reservations by various criteria and supports diacritic-insensitive queries. Search options include:
- Client’s first name
- Client’s last name
- Client’s email
- Client’s phone number
- Company name
- Company registration number (IČO)
- Product serial number (S/N)
¶ Create Button in the Dashboard
At the top of the Dashboard, the Create button allows for quick reservation creation.
- Create a Reservation – Clicking Create Reservation opens a dialog where you can set the basic parameters (see Reservations section).
- Save the Reservation – After entering and confirming the initial data, the reservation is saved.
- Edit Details – Once saved, a detail form automatically opens, allowing you to enter additional information.
¶ KPI Widgets and Charts
The Dashboard includes key metrics and statistics, visualized through charts and KPI widgets.
¶ KPI Widget Settings
Available settings for KPI widgets include:
-
Title of the widget
-
Subtitle with a description
-
Refresh Settings – Type of data refresh (interval-based, one-time, or disabled)
-
Refresh Interval [min]
-
Date Filter, consisting of:
- Date Field Selection – e.g., from, to, created, last modified, etc.
- Value – e.g., current month, previous month, current year, etc.
-
Background Color and Text Color
-
Advanced Settings, including:
- Suffix
- Decimal Places
- Aggregation Type – Sum, Count, or Average
-
Filter – A customizable custom filter. For more on using custom filters, see the section above: Core Application Features – Using Custom Filters.
¶ Predefined KPI Widgets
Predefined KPI cards in the Dashboard include:
- Number of active reservations
- Number of completed reservations
- Number of overdue reservations
- Number of new reservations
¶ Card 1 – Active Reservations
- Title: Reservations
- Subtitle: Number of active reservations
- Aggregation Type: Count
- Filter: Reservations with status TO DO and In Progress
¶ Card 2 – Completed Reservations
- Title: Reservations
- Subtitle: Number of completed reservations
- Aggregation Type: Count
- Filter: Reservations with status DONE
¶ Card 3 – Overdue Reservations
- Title: Reservations
- Subtitle: Number of overdue reservations
- Aggregation Type: Count
- Filter: Reservations in In Progress status, where the end date is earlier than today
¶ Card 4 – New Reservations
- Title: Reservations
- Subtitle: Number of new reservations
- Aggregation Type: Count
- Filter: Reservations in status TO DO
¶ Onboarding Steps
Onboarding is a guided setup process that helps new users get familiar with the system’s functionality. It walks the user through the key topics and steps necessary to gain a comprehensive understanding of the application.
¶ AI Assistant and Links to Product Documentation
An intelligent chatbot is available to answer questions about using the application. The bot also includes links for fast access to documentation and support materials directly from the Dashboard.
¶ Dashboard Customization
Widget settings can be adjusted using the gear icon. Clicking it opens a dialog window where you can edit values such as the title, subtitle, date filters, aggregation type, data column selection, filter settings, etc. These adjustments let users customize the Dashboard to fit their personal needs.
We are currently working on new features that will offer even more Dashboard customization, including:
- Adding/removing widgets
- Saving personalized layouts
- Adjusting widget sizes and order
- Notification settings
- Data export
- Calendar and task integration
- Defining default Dashboards for other users
¶ Price Lists
The Price Lists directory defines possible prices for reservation items, prices are stated including VAT.
¶ Price List Detail
The detail of the price list contains the following fields:
- Code - mandatory (10 characters)
- Name - mandatory (100 characters)
- Rental Group - selection from the Rental Group list
- Price List Validity From - date of validity from
- Price List Validity To - date of validity to
- Currency - EUR, USD, CZK
¶ Price List Items
The list of price list items includes individual product attributes and the assigned unit price and deposit amount. Items are in the grid with columns:
- Performance Category - selection from the directory
- Product Category - selection from the directory
- Size From - size as an attribute on the product from
- Size To - size as an attribute on the product to
- Day From - To - definition for which reservation day intervals this unit price is valid
- Price with VAT - unit price for the interval
- Deposit
Items are added via the Add Item button. Items can be removed via the Delete button.
- Click on `Add Item`.
- A dialog box for creating a new item will appear.
- Fill in the required fields.
- Click on `Save`.
¶ Price List Management
Every price list allows:
¶ Creation
- Click on the
Add Recordbutton. - A dialog box will appear where you can enter the
CodeandName. - After confirmation, the detail will appear where you can set other attributes.
- Click on `Add Record`.
- Fill in the `Code` and `Name`.
- Click on `Save`.
- In the details, you can set `Rental Group`, `Price List Validity From`, `Price List Validity To` and `Currency`.
- Click on `Save`.
¶ Update
- Click on the item in the directory you want to update.
- The detail with all the information about the item will appear. Update the necessary fields.
- Click on
Save.
- Click on the item you want to update.
- In the details, update the necessary fields.
- Click on `Save`.
¶ Delete
- Click on the
Deletebutton next to the item you want to remove. - Confirm your choice in the appearing pop-up window.
- Click on `Delete` next to the item you want to remove.
- Confirm your choice in the appearing pop-up window.
By following these steps, you can effectively manage the Price Lists directory.
¶ Products
Before creating a product, it is necessary to create records in the directories Rental Groups, Product Categories, Performance Category, VAT Levels. Products can be either a Product type or a Service type. Product represents a physically available item.
This is a directory of products that are rented and contain values:
- Rental Groups - link to directory, value from directory
- Product Categories - link to directory, value from directory
- Performance Category - link to directory, value from directory
- Size - numerical value
- VAT Level - link to directory, value from directory
- Manufacturer - text (100 characters)
- Model - text (100 characters)
These attributes also feed into the price list to define the price according to properties. In reality, a product represents properties under which several physical items fall.
¶ Creating a New Product
- Click the
Add Recordbutton. - In the new form, fill out the following fields:
- Rental Groups - link to directory, value from directory
- Product Categories - link to directory, value from directory
- Performance Category - link to directory, value from directory
- Size - numerical value
- VAT Level - link to directory, value from directory
- Manufacturer - text (100 characters)
- Model - text (100 characters)
- Click the
Savebutton.
¶ Updating an Existing Product
- In the list of products, click the
Editbutton next to the product you want to update. - Make the necessary changes in the available fields, in the same way as when creating a new product.
- Click the
Savebutton.
¶ Deleting a Product
- In the list of products, click the
Deletebutton next to the product you want to delete. - Confirm the deletion in the displayed pop-up window.
By following these steps, you will be able to fully work with the Product directory.
¶ Sets
The QASIDA Rental system also supports the renting of entire sets. Sets are not composed of specific products but are instead made up of price categories.
For example, a Children’s Ski Set may include items such as skis, ski boots, and ski poles – these are price categories. During a reservation, actual products from the respective price categories are rented out based on the customer’s needs.
The Sets registry consists of information divided into tabs:
- Detail – Basic information about the set
- Items – Price category items that belong to the set
The following operations can be performed in the Sets registry:
- Create, edit, or delete a set
- Add or remove set items
- Export the list of sets
¶ Detail
The Detail tab contains the following information about a set:
- Code – A unique identifier for the set
- Name – Name of the set
- System Integration – Link to an external system (e.g., QASIDA ERP)
- VAT Level – VAT rate, value from the VAT Level dictionary
¶ Items
The Items tab contains data about the set's components (price categories):
- Code – Unique identifier of the set item
- Name – Name of the set item (e.g., skis, boots, etc.)
¶ Managing Sets
¶ Creating a Set
1. In the Sets registry, click the `+ Add Record` button.
2. A dialog window will appear. Fill in the required fields for the set:
   - `Code` – Enter a unique identifier for the set
   - `Name` – Enter the name of the set
   - `VAT Level` – Select a value from the VAT Levels dictionary
3. Click `Save`.

After saving, the set detail will open where you can edit values or switch to the next tab to add items.
¶ Editing a Set
To update an existing set:
1. Open the set detail to be updated (by double-clicking or selecting it and clicking `Edit`)
2. The detail view will appear with all set data. Update the necessary fields.
3. Click `Save`.
¶ Deleting a Set
To remove one or more sets:
1. Select one or more sets to delete.
2. Click the `Delete` button located above the list of sets.
3. Confirm your choice in the dialog window by clicking `Yes`.
¶ Managing Set Items
¶ Adding an Item to a Set
To add a price category to a set:
1. In the Sets registry, go to the `Items` tab.
2. Use the selector to choose the desired price category.
3. Click the `Assign Price Category` button to add the item to the set.
¶ Deleting an Item from a Set
To remove one or more set items:
1. Select one or more items you want to delete.
2. Click the `Delete` button located above the list of serial numbers.
3. Confirm your choice in the dialog window.
¶ Exporting the List of Sets
To export the set list:
1. Open the Sets registry from the main menu in the Rental application. You can apply filters or sort the list as needed.
2. Click the `Export` button located above the product list.
3. The export will begin, and the file will download as an `.xlsx` file.
4. The file will be saved according to your browser’s download settings.
¶ Reservations
The Reservations section is a key part of the Rental system. It contains a list of all reservations and their statuses and is used to manage both short-term and long-term product rentals, returns, and potential buyouts of rented items.
The reservation list supports custom filters and column-based sorting. At the top, there is a search bar that allows full-text search across reservations.
¶ Summary Tab
The Summary tab provides essential information that users might need quick access to. It is divided into the following sections:
-
Contact Person – contains customer contact details:
- Last Name, First Name, Phone Number, Email, ID Card Number
-
Overview – basic reservation details:
- Branch – selection from the Branches master data
- Reservation Type – selected from the Reservation Types list (read-only)
- Number Series – selected from the Number Series list (read-only)
- Created – date the reservation was created (read-only)
- From – start date of the rental period
- To – end date of the rental period
- Number of Persons – if tracking of persons is enabled for the rental group
- Deposit – deposit amount for the rental (read-only)
- Rental Price – total rental cost (read-only)
¶ Persons Tab
The Persons tab appears only if the reservation type requires person tracking.
This tab lists the individuals for whom the products were rented and includes binding force calculations:
- Name
- Skill Level – beginner, intermediate, advanced
- Age – selected from predefined age ranges
- Weight – selected from predefined weight ranges
- Height – selected from predefined height ranges
- Sole Length – selected from predefined sole length ranges
- Binding Force – calculated binding force (based on the calculation from www.dincalculator.com)
¶ Borrowed Goods Tab
The Borrowed Goods tab tracks the items the customer intends to rent and the price list used for price calculation.
Recorded fields include:
- Price List – selection from the Price Lists master data. The selected price list is used only for calculating the current item being added. Previously added items (possibly using another price list) are not recalculated retroactively. To recalculate all items based on the selected price list, use the Recalculate button.
- Item Name – name of the product (from the price list)
- Serial Number – specific product identified by its serial number
- Quantity – number of units
The list of items is presented in a table with the following columns:
- Category
- Performance Category
- Manufacturer
- Model
- Unit Price excl. VAT – base price per unit excluding VAT
- Unit Price incl. VAT – price per unit including VAT
- Quantity
- Total Price excl. VAT – unit price excl. VAT × quantity
- Total Price incl. VAT – unit price incl. VAT × quantity
- Deposit
Below the list is a summary section, where a total discount can be entered either as a fixed amount or as a percentage.
The Amount to be Paid represents the total of the deposit and item prices including VAT, minus any previously paid amount.
¶ Returning Goods Tab
This tab is used to manage the return or exchange process of rented items.
The form includes:
- Serial Number Search Field – for quickly locating a specific product
- Return Item Button – marks the selected items as returned
- Return All Items Button – marks all items as returned
- Exchange Item Button – replaces the product with another one (with a different serial number)
The product table displays the following information:
- Returned – yes / no
- Category
- Performance Category
- Manufacturer
- Model
- Set
- Serial Number
- Unit Price excl. VAT – base price per item without VAT
- Unit Price incl. VAT – price per item including VAT
- Discount
- Abs. Discount
- Total Price excl. VAT – unit price excl. VAT × quantity
- Total Price incl. VAT – unit price incl. VAT × quantity
- Penalty
- Deposit
¶ Invoice Details Tab
-
Client is a company – When this checkbox is selected, company data is used for billing. If the client is a company, billing details are company data. If the client is an individual, billing details are personal data (see Clients section). These details are also automatically saved for the customer in the Clients section.
-
Billing data same as contact person – When selected, the billing information is automatically pre-filled using the contact information from the Summary tab.
¶ Personal Details (For Individuals)
- First Name * – Required
- Last Name * – Required
- Phone Number * – Required
- Email * – Required
- Date of Birth – Optional
- Preferred Language – Client's preferred communication language
- ID Card Number – Optional, if required
- Customer Card – Info about customer's loyalty or membership card, if applicable
¶ Billing Address
- Street * – Client's street address or company headquarters
- Street Number * – Required
- Building Number – Optional
- Postal Code * – Required
- District – Optional
- Region – Optional
- City * – Required
- Country * – Required
¶ Company Details (For Companies)
- Company Name * – Required
- Company ID * – Organization’s identification number
- Tax ID – Optional
- VAT ID – VAT registration number, if applicable
- Phone Number – Company contact number
- Email – Company contact email
¶ Invoices Tab
The Invoices tab contains invoice records related to the reservation.
An invoice is generated by clicking the Invoice button at the top of the window – the procedure is described in the section Reservation Management → Invoice Issuance.
The invoice overview table includes:
- Invoice Number
- Document Type
- Unpaid Amount
- Paid Amount
- Issue Date
- Due Date
- Invoice Status
- Total Amount incl. VAT
¶ Other Data Tab
This tab includes optional parameters related to the reservation. These are defined in the system settings under the Optional Parameters registry.
¶ Documents Tab
The Documents tab is used to store contracts, manuals, and other files related to the reservation or rented product.
At the top, there is a Generate Contract button – the procedure is described in the section Reservation Management → Generate Contract.
¶ E-mail Log Tab
This tab records all email communications. The email overview table includes:
- Sender
- Recipient
- Sent Date
- Status
¶ Managing Reservations
¶ Workflow
At the top of the reservation detail form, you will find a sequence of workflow steps for reservations.
The current state of the reservation is highlighted with color. You can change the reservation's state if the transition between states is allowed.
The workflow states, their order, related actions, color indicators, and all workflow settings are configured in the Workflow registry.
¶ Creating a New Reservation
You can add a new reservation from the reservation list using the New Reservation button. After clicking the button, a dialog will appear with the following options:
- Rental Group – Defines, among other things, which price list can be selected. These rental groups are displayed as buttons.
- Reservation Type – Selected from the Reservation Types registry. The reservation type also determines the workflow assigned to the reservation.
- Existing Customer – If the reservation is for an existing customer, their data can be searched by typing (autocomplete). The search works with first name, last name, and loyalty card number.
- Price List – Select from the list of available price lists.
- Number of People – Specifies the number of people the products are being rented for.
- From - To – These dates define the rental period. Below the date fields, quick-select intervals are available: 1M, 2M, 3M, and 1Y.
Steps to create a new reservation:
1. Click the `New Reservation` button.
2. Select the desired `Rental Group`.
3. Choose the `Reservation Type` from the registry.
4. If the reservation is for an `Existing Customer`, start typing to search.
5. Select the `Price List` from the dropdown.
6. Enter the `Number of People`.
7. Select the rental period `From - To`.
8. Click `Confirm`.
¶ Adding a Person
Clicking the Add Person button allows you to add a person and define attributes used to calculate the binding force, specifically:
- Person's Name
- Expertise – Beginner, Intermediate, Advanced
- Age – Age range
- Weight – Weight range
- Height – Height range
- Sole Length – Boot sole length range
- Binding Force – The calculated binding force, based on a method inspired by the DIN calculator.
1. Click the `Add Person` button.
2. Fill in the `Person's Name`.
3. Select the level of `Expertise`.
4. Choose the `Age` range.
5. Choose the `Weight` range.
6. Choose the `Height` range.
7. Choose the `Sole Length` range.
8. The `Binding Force` will be calculated automatically based on the input.
Once the initial setup is confirmed and all necessary people have been added, the reservation detail view will open.
¶ Editing an Existing Reservation
You can edit an existing reservation by double-clicking on it in the reservation list. This action opens the reservation detail view.
1. Go to the reservation list.
2. Double-click the reservation you want to edit to open its detail view.
3. Modify the necessary information and don't forget to save your changes.
¶ Deleting a Reservation
The workflow for deleting a reservation is as follows:
1. Select one or more reservations you want to delete.
2. Click the `Delete` button located above the reservation list.
3. Confirm your selection in the dialog window that appears.
¶ Returning Items
The Item Return tab covers the process of returning rented items identified by their serial number.
Item return workflow:
1. Enter the original item's serial number into the search field, or locate and select it in the table.
2. Click the `Replace Item` button.
3. Enter the serial number of the new item.
You can also mark an item as returned by checking the box in the "Returned" column.
¶ Item Replacement
The Item Return tab also covers the process of item replacement, based on the item's serial number.
Item replacement workflow:
1. Enter the original item's serial number into the search field, or locate and select it in the table.
2. Click the `Return Item` button.
3. The final overpayment or underpayment amount is calculated based on the item price and deposit amount.
In case of a penalty, locate the item in the table and enter the penalty amount in the "Penalty" column.
¶ Issuing an Invoice
An invoice can be issued by clicking the Invoice button located at the top of the reservation detail screen.
To generate an invoice, you must have predefined settings in the system for: number series, payment methods, contract templates, and email templates — these are configured in the Number Series, Payment Methods, Templates, and Email Templates registries.
Workflow for issuing an invoice:
1. Click the `Invoice` button.
2. A dialog window will appear to enter the necessary invoice data.
3. Select the `invoice template`.
4. Choose the `number series`.
5. Fill in the required fields: `issue date, taxable supply date, due date`. Optionally add a `note`.
6. Select the `payment method`.
7. Choose whether to `send the contract by email`. If yes, select the `email template` and verify the `recipient email address` (auto-filled from contact data).
8. If the invoice has already been paid, check the `Already Paid` checkbox.
9. Confirm invoice creation by clicking the `Save` button.
¶ Generating a Contract
In the reservation detail under the Documents tab, there is a Generate Contract button at the top.
To generate a contract, a contract template and an email template must be prepared in advance — these are set up in the Templates and Email Templates registries.
Workflow for generating a contract:
1. Click the `Generate Contract` button.
2. A dialog window will appear to enter the necessary contract data.
3. Select the `contract template`.
4. Choose the `number series`.
5. Enter the `document name`.
6. Choose whether to `send the contract by email`. If yes, select the `email template` and verify the `recipient email address` (auto-filled from contact data).
7. Select the `product` that is the subject of the contract.
8. Confirm contract generation by clicking the `Generate` button.
¶ Overviews
The Overviews section provides all essential information about invoices, deposits, products, and reservations in one place — saving time, improving process accuracy, and helping you deliver professional service to your customers.
Overviews support date filtering, flexible quick filters, and a clear value summary beneath the lists.
¶ Invoice Overview
Here, you can track all issued invoices and their current status in a clear list where custom filters can be applied.
Key data shown in the invoice overview:
- Invoice Number
- Document Type
- Issue Date
- Due Date
- Taxable Supply Date
- Invoice Status
- Unpaid Amount
- Total Amount incl. VAT
- VAT
- Total Amount excl. VAT
- Total Rental Price
- Total Deposit Amount
- Total Penalty Amount
- Total Item Discount
- Reservation Number
- Reservation Status
- Customer Name
- Company ID (IČO)
- Phone Number
¶ Deposit Overview
This overview provides a clear list of all deposits, their amounts, and statuses, with the ability to apply custom filters.
Key data shown in the deposit overview:
- Invoice Number
- Document Type
- Reservation Number
- Product Name
- Set – yes / no
- Deposit
- Deposit Status
- Customer Name
- Company ID (IČO)
- Phone Number
¶ Product Overview
Use this overview to check product availability for specific dates and quickly answer questions like: “Do we have anything available for date XY?” The data is displayed in a structured list with filtering options.
Key data shown in the product overview:
- Product Type
- Location
- Product Category
- Manufacturer
- Model
- Serial Number
- Performance Category
- Size
- Rental Group
- Unit Price
- Deposit
¶ Reservation Overview
This overview gives a detailed view of current reservations, organized by individual products, with custom filter support.
Key data shown in the reservation overview:
- Product Name
- Serial Number
- Product Category
- Performance Category
- Manufacturer
- Set Name
- Unit Price
- Reservation Number
- Deposit
- Deposit Status
- Product Status
- Customer Name
- Company ID (IČO)
- Phone Number
¶ Clients
The Clients register contains various information about clients. The following steps will help you manage all necessary operations.
¶ Creating a New Client
- Click on the
Add Clientbutton. - In the new form, fill out the following required fields:
- First Name
- Last Name
- Phone
- Click the
Savebutton. After saving, a client detail view will be displayed where you can fill in additional information:- Street
- Street Number
- Orientation Number
- City
- Postal Code
- Region
- District
- Country
¶ Updating an Existing Client
- In the list of clients, click the
Editbutton next to the client you wish to update. - Make the necessary changes in the available fields, just like when creating a new client.
- Click the
Savebutton.
¶ Deleting an Existing Client
- In the list of clients, click the
Deletebutton next to the client you wish to delete. - Confirm your decision in the dialog box that appears.
Mastering these steps will allow you to fully work with the Clients Directory.
¶ Imports
This section of the system enables the import of master data into the Rental application using an XLS file format.
¶ Import History
- The Import History section displays a list of past imports, including information about the date, result, and user who performed the import.
- In the detail view of each record, you will find logs, import success status, and a breakdown of the import process.
- At the top of the import history list, there is a New Import button used to start a new import operation.
¶ Import Samples
- This section contains sample XLS templates with standardized import structures used across Asseco Solutions systems.
- Sample files, including data structure descriptions and user guides (available in English, Slovak, and Czech), are accessible for download directly from the Rental application.
¶ New Import
- Selecting New Import initiates a new import process. The user selects the desired record type (e.g. master data), which then displays a list of available import types related to the selected entity (including linked entities and reference master data it depends on).
- In the Selection column, the user chooses the folder where the import files are located.
- In the Template column, a sample XLS file is provided.
- The import process runs in the background. Once the import is complete, the user is notified in the Rental application.
- Clicking the notification redirects the user to the import detail view, where the full log and result summary of the process are displayed.